Hosting your website involves renting space on a third-party server where you can store your website content, making it accessible to the public using your domain (yourbusiness.com). To host a website, research and pick the best hosting providers, sign up for an account, then use a site builder like WordPress to create your site.
Bluehost offers all the tools you need to host a website for as little as $2.95/month—which is why we used them as the primary example in this article. From web hosting and domain names to one-click content management system installations and website security, they help you get a hosted website up and running in under an hour. Click here to get started with Bluehost.
Here’s how to host a website in seven steps.
1. Determine Hosting Needs & Plan Type
To build a business website, all businesses need an affordable hosting plan, a domain name, website security ― a secured socket layer (SSL) certificate ― and site builder. Start by determining which of these you have and which you still need. Then, consider what hosting features you want, including email, uptime, bandwidth, storage, domain privacy, customer support, and site speed. Use these collective criteria to determine which web host and hosting plan meet your needs.
Determine Hosting Needs
While every business is different, most will require a host that provide reliable uptime, ample storage, sufficient bandwidth, and customer support. Other considerations include site security and privacy, free domain name inclusion, email, and site backups. Consider each of these carefully to determine what your basic hosting needs are.
To assess your needs, review these criteria and note which ones are most important:
- Uptime: Many hosts promise uptimes of more than 99%, but be sure you check user reviews to see if this is accurate; also, confirm that there is a money-back guarantee if a host experiences lower uptimes than promised; it is recommended that you do not choose a host with unpublished uptime data
- Storage: Site storage needs are dependent on how much content you will have on your website; lower-tier plans often have limits, which might suffice for starter sites, but if you have a significant amount of video or interactive content, consider plans with unlimited storage
- Bandwidth: Typically notated as an amount of memory or data, such as 6GB, bandwidth determines how much traffic your site will be able to handle in a given month; sites with significant multimedia content will likely need higher bandwidth ― upward of 12GB ― to accommodate lots of traffic, while simple text-based sites will need less
- Customer support: Small businesses can have problems navigating some hosting dashboards or struggle to troubleshoot hosting problems themselves; if you are non-tech-savvy, consider plans with responsive customer support
- Site security: Many hosts now provide a free SSL certificate for encrypting site data as well as domain privacy for protecting your site registration information; if security is important to you, keep these in mind as you review hosts and plans
- Domain name: If you do not already have a domain name for your site, consider hosts that offer free domains as part of their hosting packages
- Email: Not all hosting plans that offer a free domain name also offer free email. If you would like a professional email address, ensure your host includes this with your hosting package
- Site backups: To protect your site content, it’s wise to perform regular site backups; if you are unsure about how to do this yourself, look for hosts with easy-to-implement or automatic site backups
Decide Which Plan Type Meets Your Needs
Website hosting plans are offered in three main categories — shared hosting, cloud hosting, and virtual private server (VPS) hosting. Shared hosting is generally slower, accommodates limited traffic, and comes with relatively little storage. Cloud hosting handles traffic peaks well and supports content-rich sites easily. Finally, VPS hosting is touted for a large — sometimes unlimited — amount of storage and significant bandwidth. Using your notes above, choose a fitting plan type.
There are three main types of web hosting plans for small businesses: shared hosting, cloud hosting, and VPS hosting.
Shared Hosting
In shared hosting plans, multiple websites are stored on one server so that they have to share the space. This means that your website’s speed may be affected by heavy traffic to another website that is stored on the same server. However, for startup companies, there are usually plenty of resources to go around; small websites run quite smoothly on these plans. Expect to pay between $3 and $20 for these plans.
Cloud Hosting
Cloud hosting plans allow your website to access multiple shared servers — all connected via the Internet — to meet its storage and bandwidth needs. If one server is down, another kicks in to meet the need. You can also increase your storage or bandwidth manually to deal with promotional or seasonal traffic spikes. If your website loads slowly on a shared hosting plan, consider an upgrade to a cloud hosting plan. Plans generally range from $20 to $40 per month.
VPS Hosting
VPS hosting doesn’t rely on shared resources. Instead, dedicated storage and bandwidth are allocated just for your site so other websites won’t cut into your resources. This ensures a more stable website experience. If you are a midsized business needing to safeguard large amounts of personal customer data and accommodate heavier traffic, this is a good plan for you. These types of plans generally range from $30 to $70 per month.
2. Choose a Hosting Provider
Once you know your plan type and your hosting needs, price out hosting companies with plans that meet those needs. While there are many options available, we have included three industry leaders below. Review their basic features, then select that one works for you.
Bluehost ― Best for Companies That Need a Free Domain Name
Bluehost offers some of the lowest-priced plans on the market — with more features than most providers. It offers shared and VPS plans with a price range of $2.95 per month to $59.99 per month, depending on the plan type. Plus, it adds on free features with each plan, including a domain name, email, domain privacy, website security, and more. This is best for companies that don’t already have a domain name and have a small budget to get started.
HostGator ― Best for Fast-growing Companies With Domains
HostGator has shared, cloud, and VPS plans from $5.95 per month to $49.95 per month, depending on the plan type. It is ideal for companies that have a domain but need domain privacy, email, and website security. Even in its cheapest plans, it doesn’t monitor — and so doesn’t restrict — how much bandwidth you use. So, if you’re starting an ecommerce store, for example, and want to grow traffic quickly, this is a good company to go with.
InMotion ― Best for Ecommerce Stores With Multiple Products
InMotion offers shared, cloud, and VPS plans that cost $3 to $59.99 per month, depending on the plan type. It also offers free domains, website security, and email. With storage and memory enough for a 50,000-visitor per month ecommerce website, InMotion is ideal for online stores that still need a domain and want to offer a smooth, multimedia-rich experience.
3. Purchase a Web Hosting Plan
Now that you know the types of plans available and have chosen a web hosting provider, assess their plan tiers to determine the best one for you. While shared hosting tiers vary primarily by storage offered, cloud hosting tiers vary based on the memory and storage offered, and VPS tiers offer different amounts of memory, storage, and processing power. After you’ve chosen your tier, click on the relevant button to begin the purchase process.
Shared Hosting Plan Tiers
Generally, shared plans tiers will primarily vary on the amount of storage offered, then on beyond-the-basics features. Additional features include the number of websites hosted; an SSL certificate for website security; domain privacy to protect domain owners against spam; a domain name; business email accounts; and extra tools like one-click WordPress installations or search engine optimization (SEO) tools.
Cloud Hosting Plan Tiers
Cloud hosting plans will primarily differ based on the amount of random access memory (RAM) and storage offered in each tier. Beyond that, different tiered plans may offer more free features like domain privacy to prevent spam, more websites and/or domain names, a free domain name, SSL certificate, and email accounts.
VPS Hosting Plan Tiers
VPS hosting plan tiers vary significantly. The primary differentiators include RAM, storage, bandwidth, and the number of CPUs, which translates into how much data your website can handle at once.
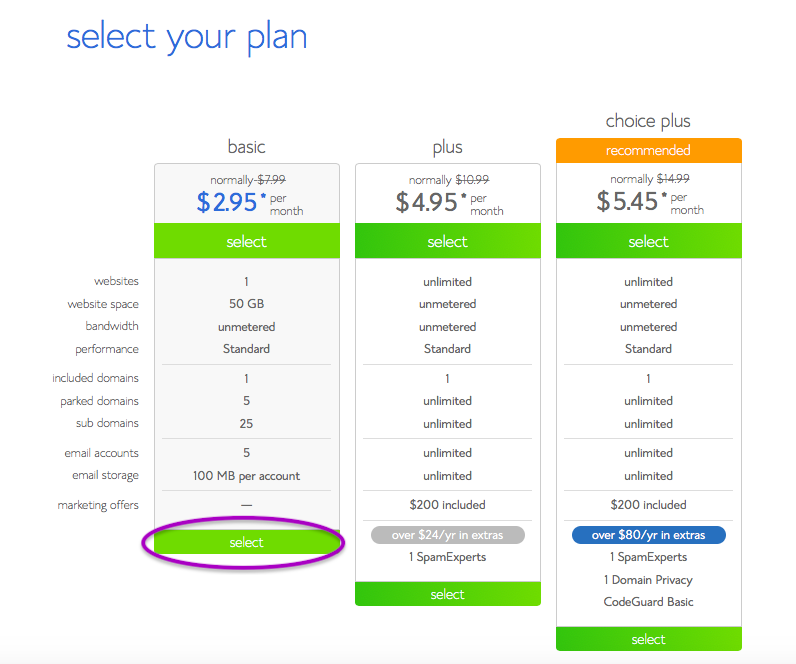
Once you’ve reviewed the tiers for the plan that fits your needs, visit your chosen hosting provider’s website and find the plan tier you want. To sign up for an account, click the relevant purchase button and complete the registration and payment process.
For example, for a Bluehost shared plan, click the “select” button as shown below.
4. Register a Domain Name
The next step in setting up most web hosting accounts is choosing a domain name. Before you do so, however, consider what you want your domain name to be, then check the availability of that domain name. Finally, purchase the domain that you want for your hosting plan. If you already have a domain, you can add it at this stage of the sign-up process.
Research Domains
To research domain names, start by making a list of possible domain names with a “.com” extension that would fit your business based on your business name, variations of your business name, and any relevant keywords for your industry. Use a keyword research tool like Ubersuggest to find variations of your business name that have high search volume and low difficulty — this ensures it will easily be found in Google searches.
For example, if you want to launch an online antique bookstore called Frank’s Bookstore, consider both your full business name, www.franksbookstore.com, and variations like www.franksbestbooks.com, www.bestantiquebooks.com, and www.franksantiquebooks.com.
For more ideas, read our tips on choosing a domain name.
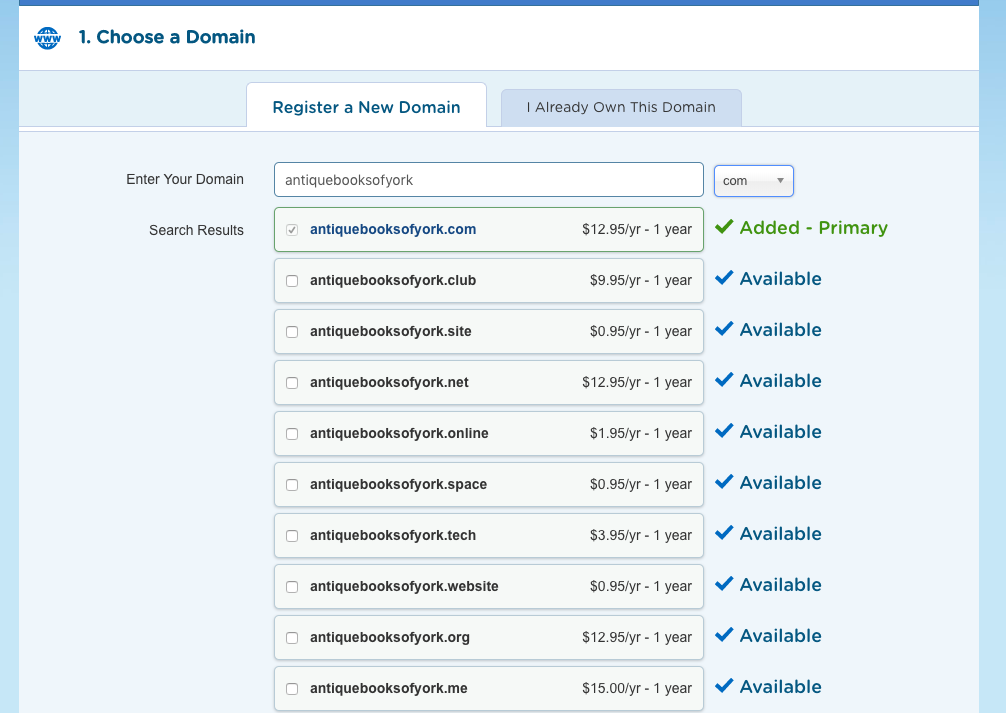
Check Domain Name Availability
Once you’ve selected a few possible domain names, check their availability using a domain name search tool. Be sure to include the .com extension when checking your domain variations as it has a more professional feel. Use the Bluehost domain search widget below to get started.
Purchase Your Domain Name
Once Bluehost notifies you that one of your domain variations is available, it will direct you automatically to a form to fill out. Fill in your name, contact information, and select any desired add-ons, like site security and domain privacy. We recommend you at least add domain privacy to shield your contact information from spammers in public domain databases. Once you’ve completed the form, hit “submit” to formally register your domain name.
Purchase a Domain Name Separately
If your web hosting plan does not come with a free domain name, you will have to purchase one separately; costs average $10 to $15 per year for domain registration. To purchase one, navigate to the site’s domain purchase page and type in the domain you’d like to buy. If it is available, you will be routed through the registration and payment process.
Purchasing a domain name with a HostGator web hosting plan.
5. Set Up Your Content Management System
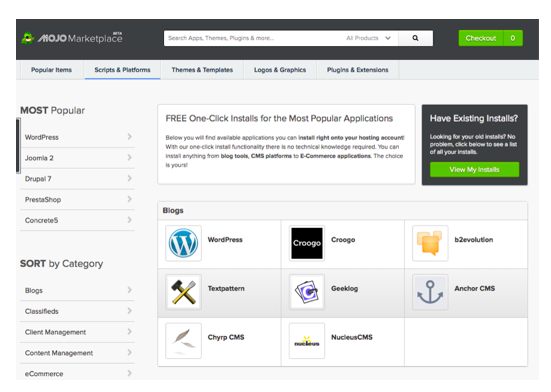
A content management system (CMS) offers users an easy way to build a website, even without coding skills. Many hosting providers offer one-click CMS installations. Bluehost is one of the most popular providers with this feature. As WordPress’ recommended hosting provider, you can install WordPress easily with one click via the Bluehost dashboard. To install WordPress, log into your Bluehost account, find the list of one-click CMS systems, then click the WordPress button to install it.
To access the WordPress one-click installation using Bluehost, log into your Bluehost account, then click on “Mojo Marketplace.” Next, click on “one-click installs.” You will land on the “Scripts and Platforms” tab. Click on the WordPress tile.
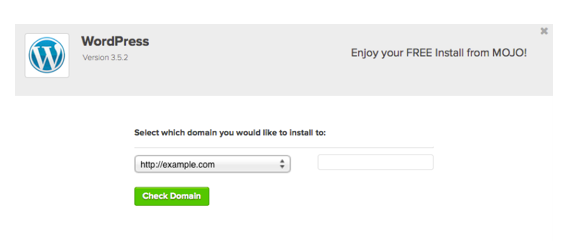
On the following screen, click the “Start” button to begin the installation. Bluehost will then ask on which domain you would like to install WordPress. Use the drop-down menu to select the correct domain, then click “Check Domain.”
Bluehost will ensure your domain is correctly connected to your new website account. A box will pop up asking you if you’re sure you want to proceed. Check the box and click “Continue.”
Next, you will be directed to an advanced options form where you can set up your username and password. Fill out the form by typing in your website name, your username ― often your email― a password, and your email address again. Check the “Automatically create a new database for this installation” and the “I have read the terms and conditions” boxes. Lastly, click the green “Install Now” button.
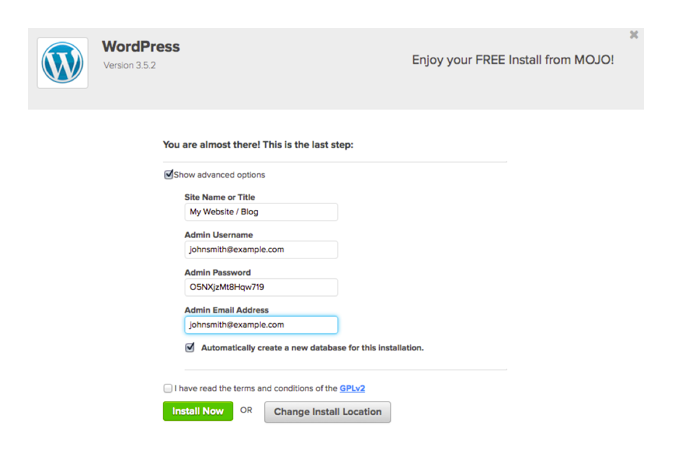
Bluehost one-click installation advanced options form.
Once your installation is complete. Bluehost will confirm your username and password on a separate screen. Make sure you write these down and keep them in a safe place. With these credentials, you can access the backend of your site and begin editing. Log in by navigating to your www.yoursite.com/wp-admin, replacing “yoursite” with your actual domain.

“Bluehost is competitively priced, and WordPress offers you the opportunity to use simple yet efficient site themes. It also allows you to customize your site as much or little as you like. WordPress makes finding, downloading, and using plug-ins easy as can be. With a large library of plug-ins to design and promote your site, you can go from no site to a user-friendly website in no time. Don’t worry if you have no experience building websites. Early in my career, I knew little about site building but, with the help of WordPress, I was able to learn and build simple and complicated sites alike.”
— Chris Williams, Founder & Digital Marketing Strategist, Clock In Marketing
6. Choose & Install a Website Theme
A website theme is a predesigned template that you can install on your site, and then edit to reflect your business brand and content. To choose a website theme, visit an online theme or template database. Then, search for your business industry or the type of website you would like. Download a chosen theme and upload it to your CMS. Use your CMS’s editor or an editor plug-in to add content and edit the template. Then, click “Publish.”
Choose Your Website Theme
While each CMS has a different source for themes, we will continue to use WordPress as an example as it is free and easy to use. To search for WordPress themes, start by perusing their own online directory of free and premium popular themes here. If you don’t find any you like, browse third-party databases of themes created by professional designers; two of the most popular databases are Theme Forest and Athemes.
All of these databases will allow you to search or sort themes. Many even allow you to filter themes by website type or the industry your business operates in. Use these features to home in on the right theme for your business. When you find one, click on it to learn more about its features. Common features include sliders, contact forms, photo galleries, product portfolios, and easy video or audio embedding.
For example, you can use the search bar in the WordPress theme directory to search for “photography,” and it will pull up the most popular themes for photography websites. You can also search different website functions like “portfolio” or “ecommerce” to find websites that can serve your business needs best.
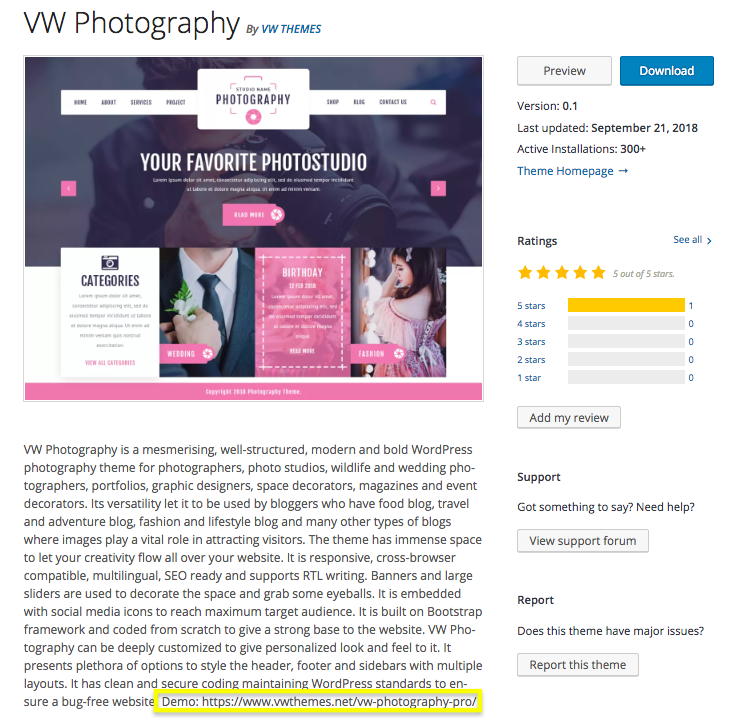
WordPress template description example — VW Photography
Expert tip: Many themes have a “Preview” button on this page which takes you to a static version of the template. Some, like the one above, offer a live demo link in the description. Click on it to see the theme “in action.” This gives you a chance to interact with it as if it were a live website, giving you a sense of what your own website might look like.
Install Your Website Theme
Once you have chosen your theme, click the download link on the theme page. In the WordPress database, for example, click the “download” button first. Then, from your WordPress dashboard, upload your theme by clicking on “Appearances” and “Themes” from your left-hand dashboard menu. At the top of the page, click “Add New.”
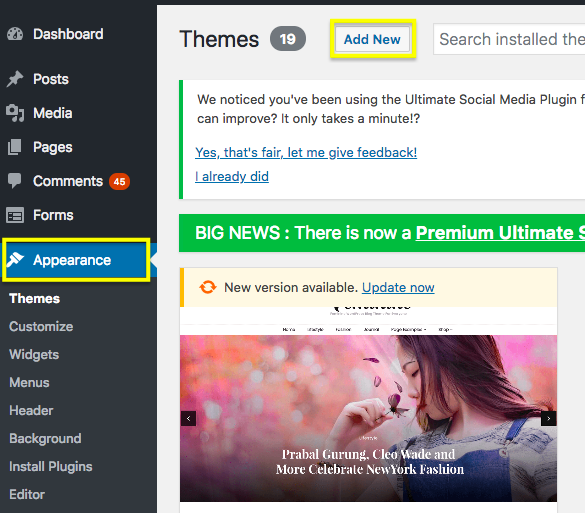
Uploading a theme to WordPress — Step 1.
Now, click the “Upload theme” button. A box will pop up for you to choose the file you’d like to upload. Click “Choose File.”
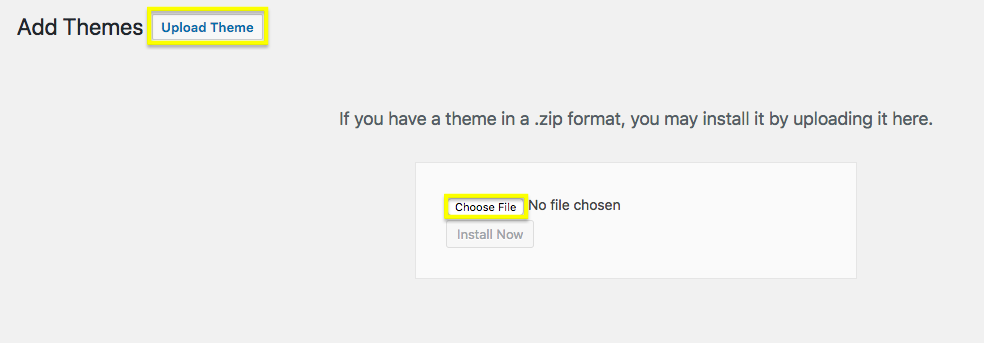
Upload a WordPress theme.
Another box will pop up so you can locate the theme on your computer. It should be in your download folder and be labeled with the theme’s name. Select it to upload it. Once your theme has uploaded, click the “Activate button.” It will load as a theme or template for your WordPress site, at which point you’re ready to begin editing it to match your brand.
7. Edit & Publish Your Website
The editing process for websites differs depending on your CMS. Some have a drag-and-drop editor while WordPress has a more traditional no-drag menu. Once your theme is activated, use menu options to change fonts, pages, colors, and images. Click on boxes to add your own information. Once you’re satisfied, publish your website.
Edit Your Theme
To edit your theme, use your CMS’s website editor. WordPress doesn’t have a drag-and-drop editor but, instead, has a more clunky point-and-click menu. Because this requires a steeper learning curve compared to drag-and-drop editors, we recommend you download a drag-and-drop editor plug-in. Then, drag elements to place them where you want them on each page. Click on them after placing within the template to edit content, style, and formatting.
Publish Your Website
Once you’re satisfied with your content and the look and feel of your new website, it’s time to hit the publish button. In WordPress, and if you’re using Bluehost, you can find this button at the top left of your screen. Once you push the “Publish” button, be sure to test your new website on several browsers and devices. If you notice things that need tweaking, push the “Edit Page” button in the top menu and resume editing.
Hosting Your Own Website — Pros & Cons
Hosting your own website has both pros and cons. The customization options, custom domain, security, and professional appearance are often worthwhile. However, some business owners may find hosting their own site to be cumbersome and clunky, offering more features than they need. It can also be costly and demand time-intensive maintenance.
Here are the pros of hosting your own website:
- Domain name: When you host your own website, you can also use a domain name that represents your business; this gives you a professional appearance and helps with brand awareness. If you don’t get hosting, you likely will have to deal with a subdomain (yoursite.weebly.com) that appears amateur
- Customization: Most hosted sites offer a great deal of customization, which gives you the chance to design your own space on the Internet; this is ideal for businesses that want to make a strong brand impression and grow their sites without limitations
- Security: The vast majority of hosting providers offer site security (an SSL certificate), which not only improves search rankings but encrypts users’ sensitive data; this is a must for ecommerce stores or any business that works with private, delicate information
Here are the cons of hosting your own website:
- Complexity: For many non-tech-savvy business owners, hosting their own site can seem daunting; the setup process alone can take a long time, and learning the ins and outs of hosting providers and CMS platforms can be very time-consuming
- Maintenance: With your own hosting comes the responsibility of maintaining your site; if there are theme or plug-in updates, you often have to install them manually; also, if your company information changes regularly, it can be a hassle to keep it update on your site
- Cost: Websites can be relatively inexpensive to start but hosting and add-ons can get expensive, especially if you choose premium themes and plug-ins; while this cost might be worth it for some business owners, others will find the return on investment (ROI) not worth it in the long run
For bloggers that don’t need a professional appearance or security options to accept online payments, using a free subdomain may be a good way to go. However, if you want a credible business website that is customized to your brand and protects your customers’ data, it’s best to go with a hosted website.
Frequently Asked Questions (FAQs)
What is a web host?
A web host is a company that offers website owners the storage and technology to store their website files and make them viewable to their website visitors. Some of the most popular web hosting providers for small businesses include Bluehost, HostGator, and 1&1 IONOS.
How do I find cheap web hosting?
To find cheap web hosting, choose a basic shared web hosting plan. For example, Bluehost offers shared hosting for $2.95 per month. This plan includes a free domain name, email, 50GB of storage, which is plenty for startups and website security to protect customer data. At $1 per month, 1&1’s shared plan doesn’t have enough security to accept credit card payments online safely, but it does offer double the storage of Bluehost’s entry-level plan.
For free web hosting options, read our buyer’s guide on the best free web hosting services of 2019.
How much does it cost to host a website?
Web hosting costs depend on your website size and business needs. You will at least need a domain name, space on a server to store your website files, and access to a content management system to create and publish a website. Small businesses can easily find shared web hosting plans for less than $5 per month that include a free domain name, space on a server, and one-click installations of popular CMS platforms like WordPress, Wix, and Weebly.
Where is the best place to host a website?
If you are a small business, choose a web hosting provider that fits your budget and hosting needs. Some of the best web hosting companies that have plans to meet your needs include Bluehost, HostGator, InMotion, and 1&1 IONOS. For more information about what these and other top small business web hosting providers can offer you, read our buyer’s guides on top cloud hosting providers and best-shared hosting providers for small businesses in 2019.
Bottom Line
Website hosting gives small businesses the tools they need to store their website files, build a website, and make it accessible to their customers. Hosting a website begins with researching the types of hosting plans that would best serve your business needs. From there, small businesses can pair one-click CMS installations offered through their hosting provider with themes and easy website builders to build a website that perfectly matches their brand.
Web hosting for small businesses doesn’t have to be expensive. For $2.95 per month, Bluehost offers the tools to host and build a website. With this entry-level plan, users get 50GB of storage, a free domain name, five free business email accounts, and one-click WordPress installation. Click here to get started.
Original post found HERE