Getting your website online can seem like a daunting task – but if you follow the right steps, it can be easier than you might think. You don’t need to be a web design expert with years of experience to build a great-looking website. It doesn’t have to cost a fortune, either!
I’ve been building websites for over ten years and reviewing web hosts and website builders for almost as long.
There are two ways you can build a website. The first option is to use a website builder – a platform that’s designed to make it easy for anyone to build a website, even with no previous experience or technical skills.
The second way is to use WordPress. This can take a little more work, but it’s still pretty easy if you are technically inclined, and it gives you more flexibility.
I’m going to be exploring both options in this guide, so keep reading to find out which is the right choice for you.
Option 1: Using a Website Builder
Website builders make it super easy to build a website. These online tools require no coding or technical skills, and they’re particularly aimed at beginners – although web developers often use them, too!
You can use a website builder to create a website that looks great, in a matter of hours – or even minutes, in some cases. Most website builders are budget-friendly, and many of them offer free plans or free trials, so you don’t even have to enter your credit card details to get started.
Website builders come with pre-designed templates that set the style, layout, and color scheme of your site. All you have to do is pick one and add your own content and images.
Different builders offer different methods of building and editing your site. I personally prefer drag-and-drop editing, as it gives you more control over the layout. You can position elements wherever you like, or add new elements by simply dragging them into place.
Some builders offer a selection of apps to choose from. This is an easy way to add functionality to your site – you can have a newsletter, an appointment booking system, a live chat box, or pretty much anything else you can imagine, usually at no added cost.
There are plenty of website builders out there, although some are much better than others. My personal favorite is Wix, as it offers hundreds of templates and great flexibility, with lots of free (and paid) apps. Check out our guide to the best website builders for some other excellent choices.
Using a Website Builder: Step-by-Step Guide
1. Decide what kind of website you want to build
With a website builder, you can create pretty much any type of website you can imagine. You may want to create a personal website, a blog, an online portfolio, or a resumé/CV. You can create a website for your business, or build an online store to sell your products or services.
Of course, a website doesn’t have to have a single purpose. For instance, you might want to create a website for your business that also has a portfolio of your work and an online store. With the right website builder, the possibilities are endless.
2. Choose the right website builder for your needs
Some website builders specialize in certain aspects of site building, so you need to know that the builder you choose offers everything you need. For example, while most builders will let you have an online store on your website, a builder like Shopify is specifically designed for e-commerce. On the other hand, its general-purpose features, such as blogging, are very limited.
The most flexible website builder is Wix, as it can do anything! It has excellent e-commerce features, tons of apps, and its drag-and-drop editor gives you complete control over how your website looks. It’s our no.1 recommendation, and I’ll be using it to demonstrate the steps to building your website in this guide. Most website builders have a similar site-building process.
Our Website Builder Recommendations
Not sure which builder to choose? Here are some recommendations for different purposes.
- If you’re building a site for a small-to-medium business, Wix is my go-to recommendation for its sheer flexibility and functionality. It has an excellent free plan you can use to build a fully functional website (although there are some limitations).
- If you’re looking for the easiest way to build your website quickly, SITE123 is super beginner-friendly.
- If you’re a creative – a photographer, designer, creator, or writer – then Squarespace is the top choice, with high-quality templates to showcase your work.
- If you have no technical experience and you want to do a bit of everything – blog, showcase your work, or even sell online – Weebly is a solid all-rounder with great e-commerce features.
- If you want to take your online store to the next level, you can’t go wrong with Shopify. This easy-to-use platform has hundreds of apps and tons of tools to help you get more sales.
3. Choose a plan
Most website builders have a free plan, or at least a free trial period. If you’re just getting started with your website, or if your budget is tight, a free plan can be the best solution. Free plans give you the chance to try out a website builder without investing upfront, and you don’t lose any money if you decide it’s not for you.
The downside to free plans is that they come with a lot of restrictions. If you’re using your website for business, you really need a custom domain name (yourcompany.com) that’s easy for your customers to remember, and free plans restrict you to using a subdomain (e.g., username.wixsite.com/yourcompany). Also, using a free plan means your website will display the builder’s branding, and this can look unprofessional.
Free plans also usually restrict the amount of traffic you can get, and you may not be able to install apps or access e-commerce features. If you’re serious about your website, it’s likely that you’ll need to upgrade to a paid plan.
When it comes to choosing your plan, knowing the type of website you want to build can help you select the best plan for both your budget and your needs. For example:
- If you want to sell online, choose a designated e-commerce plan (or a plan that supports e-commerce, at the very least). Wix has general and business/e-commerce plans to choose from, but you can only accept online payments on one of the business/e-commerce plans.
- If you want to host a lot of videos on your website, you’ll need to choose a plan with a lot of storage and bandwidth.
It’s a good idea to choose the lowest-priced plan that gives you all the features you need for now, as you can always upgrade to a higher-priced plan in the future.
4. Get started: Choose a template
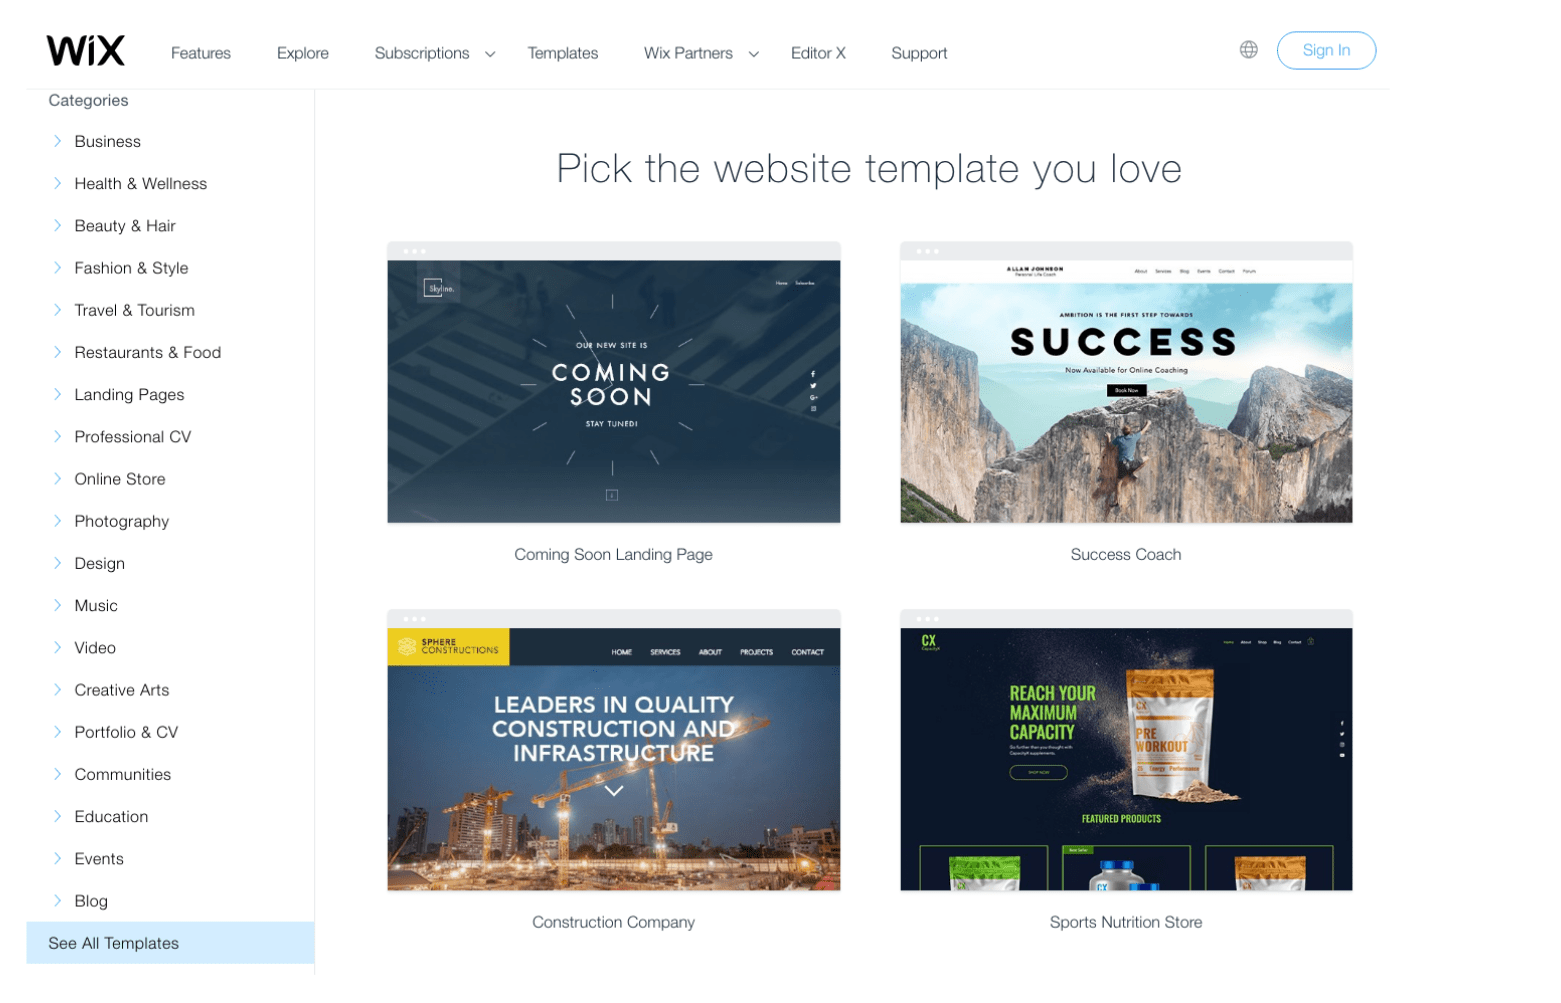
Choosing a template for your new website is always the first step in the process. All website builders use templates (some call them themes, but the terms mean the same thing) as the building blocks of your website. Templates are professionally designed to look great on all kinds of devices, and they let you get your website online in a relatively short amount of time.
The template sets the style and general layout of your website (although you can customize it later), providing you with a framework that you can easily add your own content to.
Most website builders have template libraries that you can browse even before you sign up. Templates are arranged in categories, as you can see in the screenshot from Wix’s template gallery. You can choose any template that you like, but the categories contain templates that are styled specifically for different types of websites, such as photography, business, music, or portfolios.
5. Customize your template
You don’t have to make any customizations to your website template once you’ve chosen it – but customization makes your website your own and sets it apart from other websites using the same template. For example, you might want to customize the colors and fonts used in your template to match your business branding.
Customization is really easy. While different website builders have slightly different editors (and therefore the customization process varies), the process that I’m going to demonstrate in Wix is similar to other website builders.
Changing fonts
Changing the fonts on your Wix website is simply a matter of clicking on the text you want to change and hitting the Edit Text button. You can edit each text box separately or use the Save Theme option to apply your font changes across your whole website.
In Wix, you can choose different fonts for different text types – for instance, you can choose one font for Heading 5 to use as your main headings and another font for Heading 6 which controls the sub-headings (in the template I’m demonstrating with below). You can have a different font for paragraph styles, if you like.
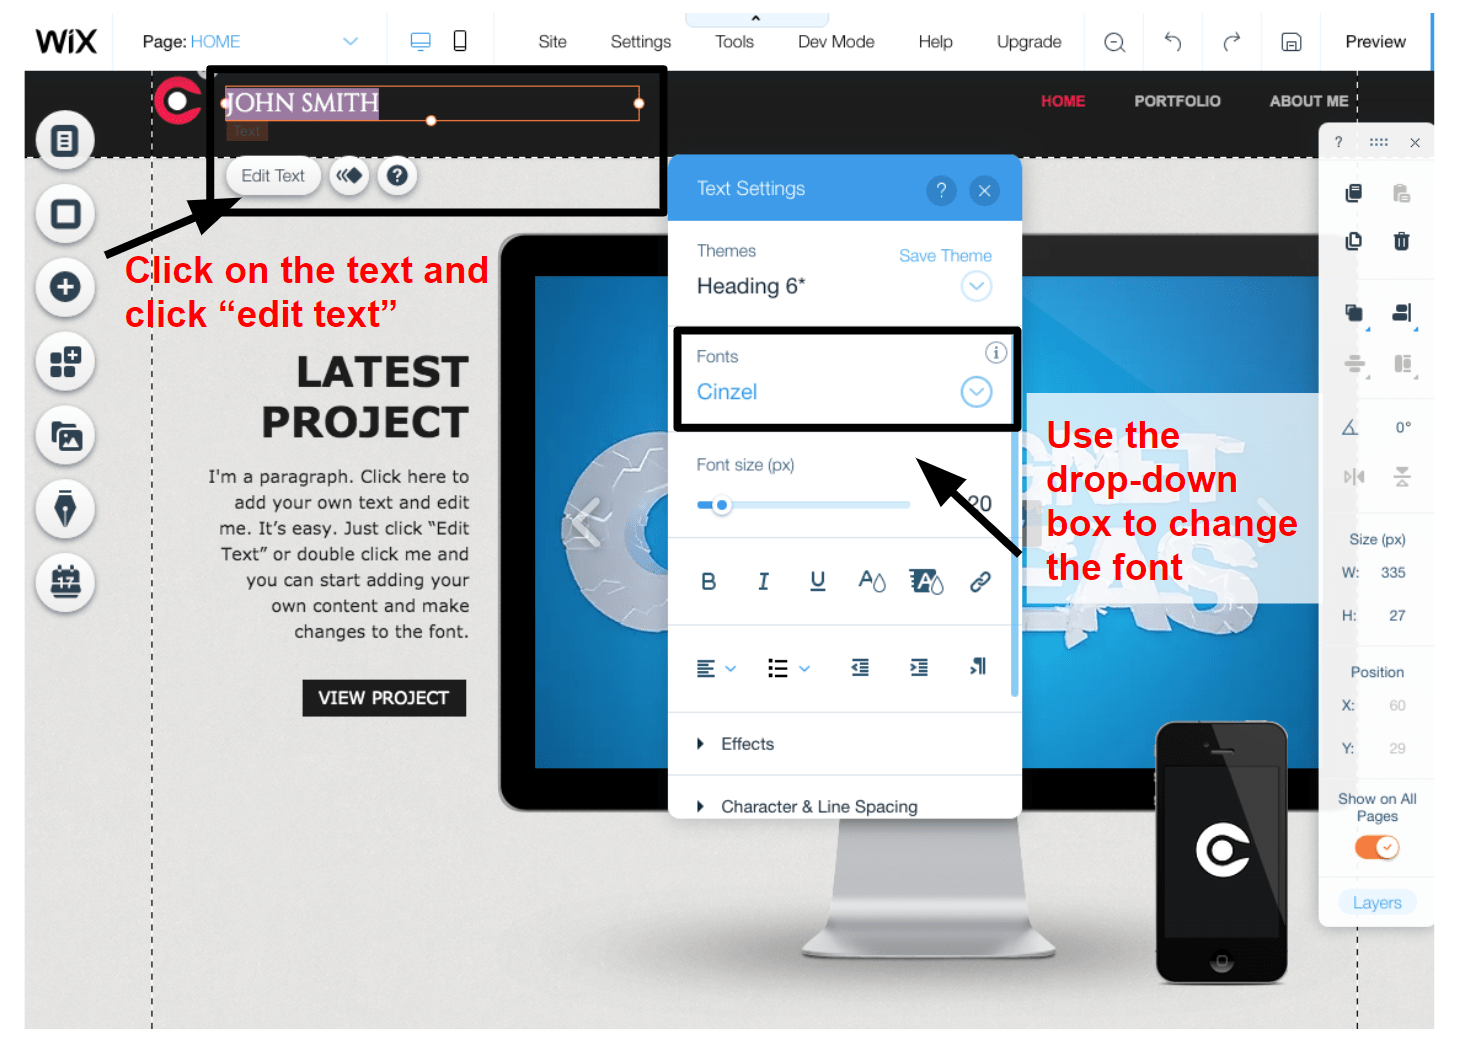
Some website builders only allow you to change the font styles for the whole website, rather than for individual headings. But in general, I’d recommend you keep a consistent style throughout your website anyway.
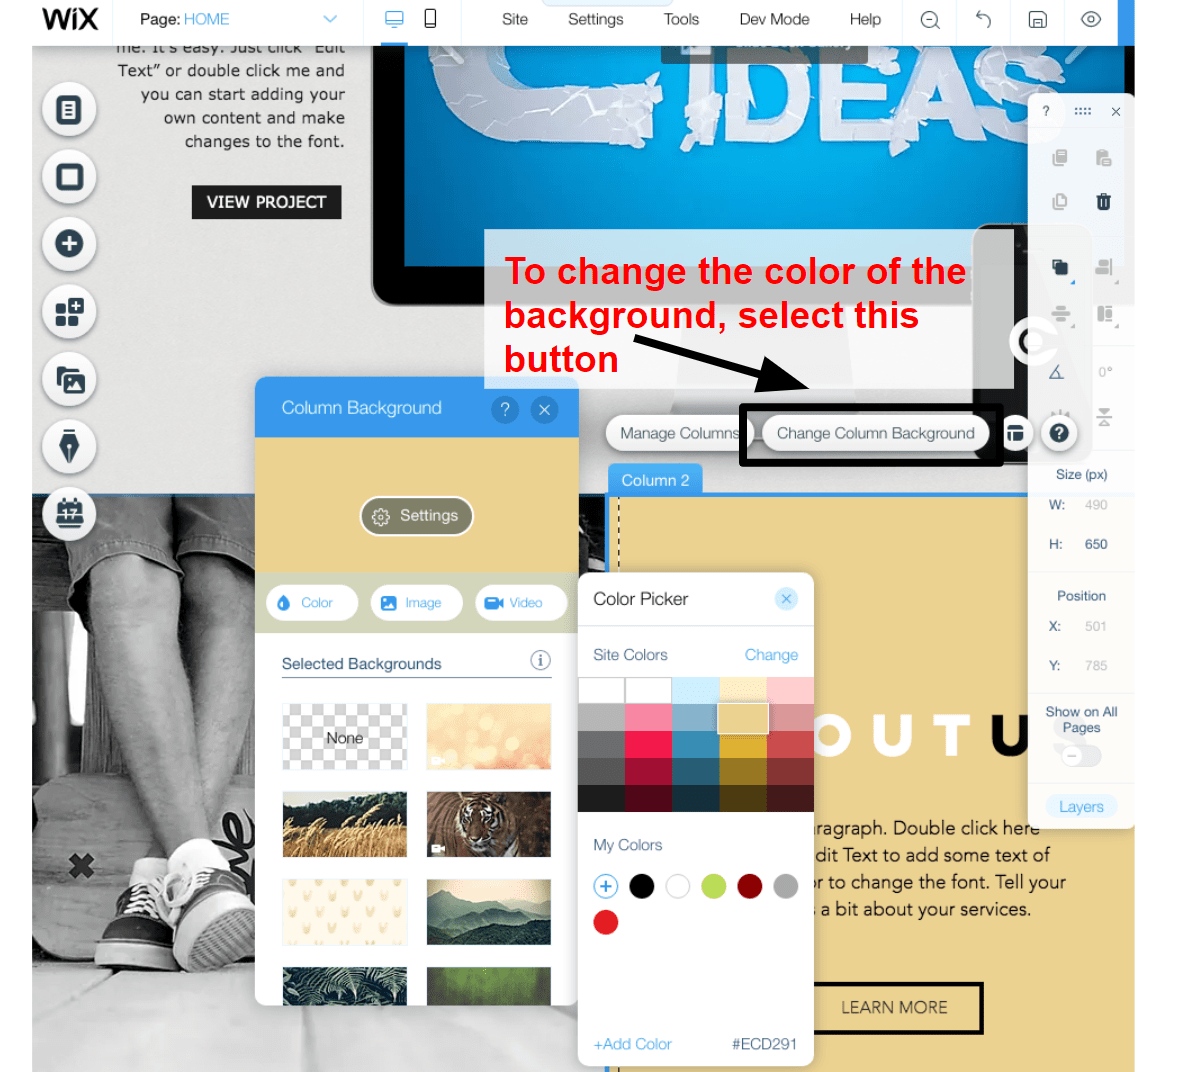
Changing colors
With Wix, you can easily change the color of your fonts in the text settings box, but it’s just as easy to change the color of other elements, like backgrounds of columns. You can use a solid color background using the color picker as demonstrated in the screenshot below.
Wix pre-defines complementary color palettes to match your theme, but you can change the color palette easily using the “change your site colors” option. You can also add your own colors to match your branding.
Moving elements around on your pages
With a drag-and-drop editor like Wix, rearranging the content on your web pages is really a matter of, well, dragging it from one place to another. The same is true of other drag-and-drop editors, while other editors may offer an up/down button method of moving sections around on your web pages.
One great feature in Wix is the Zoom Out and Reorder function. This allows you to view your whole web page and easily move sections and/or elements around on the page. The screen recording below shows how easy it is to move content using this tool.
6. Add your own content
Adding your own content is really just a matter of replacing the “placeholder” text and images in your website template with your own text and images. It’s really easy, but if you have a lot of content, it may take some time!
If you don’t have your own images, most website builders offer some kind of image bank that allows you to instantly add free images to your site.
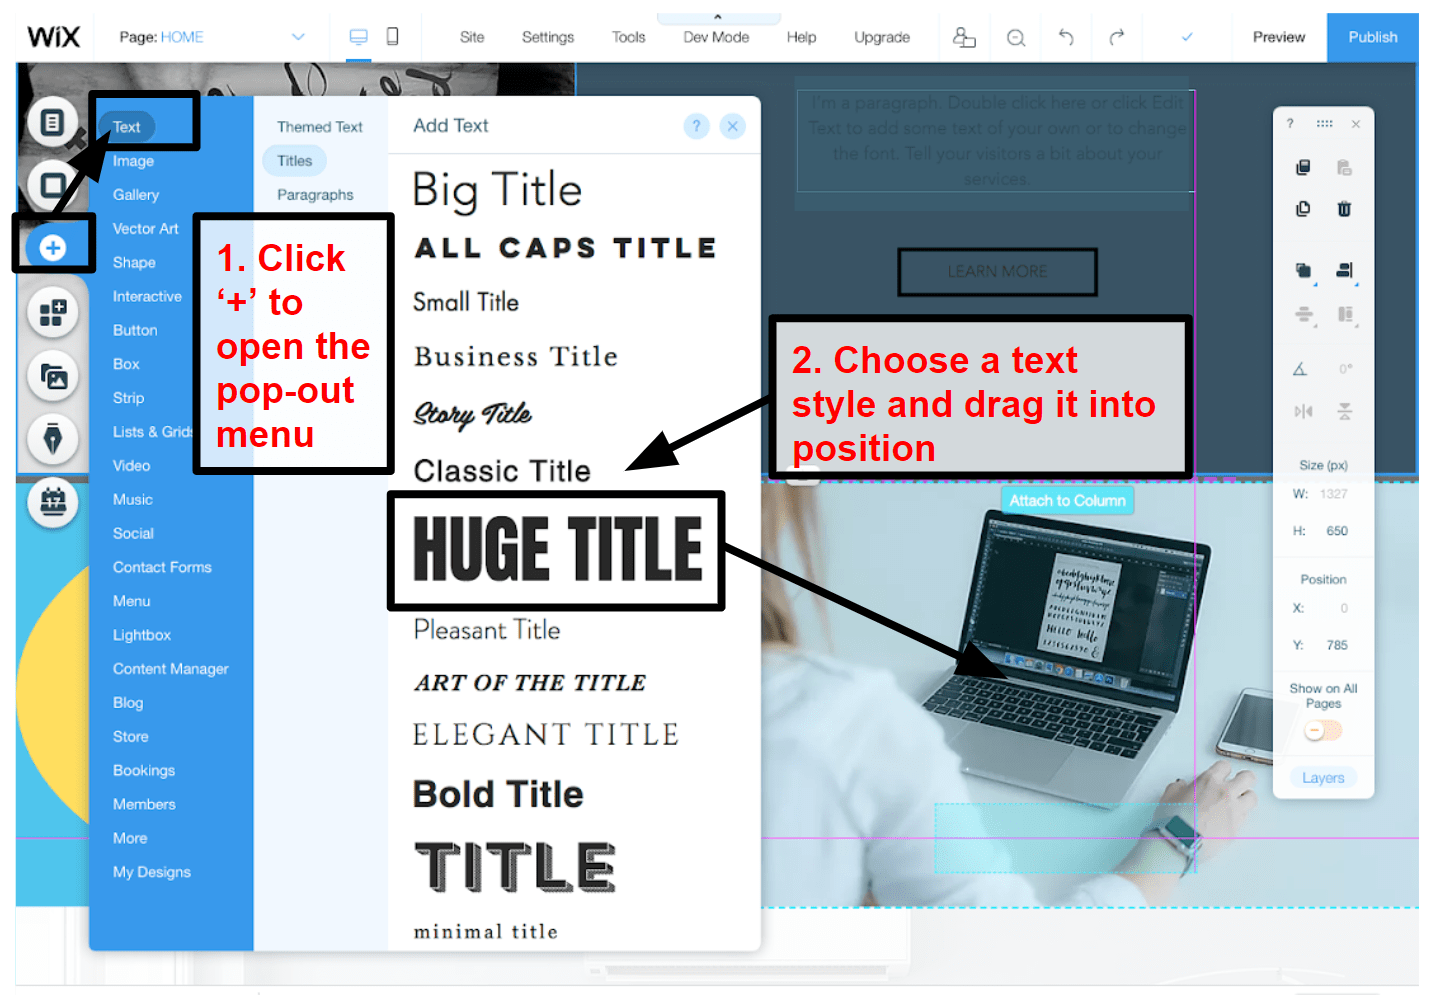
How to add text
You can add new text sections to your web pages in just a few clicks. In Wix, you use the Add tool in the toolbar on the left and then select Text in the pop-out menu.
If you want to set up your text areas all at once and then go back and add your content, you can use the free Lorem Ipsum Generator to create placeholder text to use until you’re ready to add your own text.
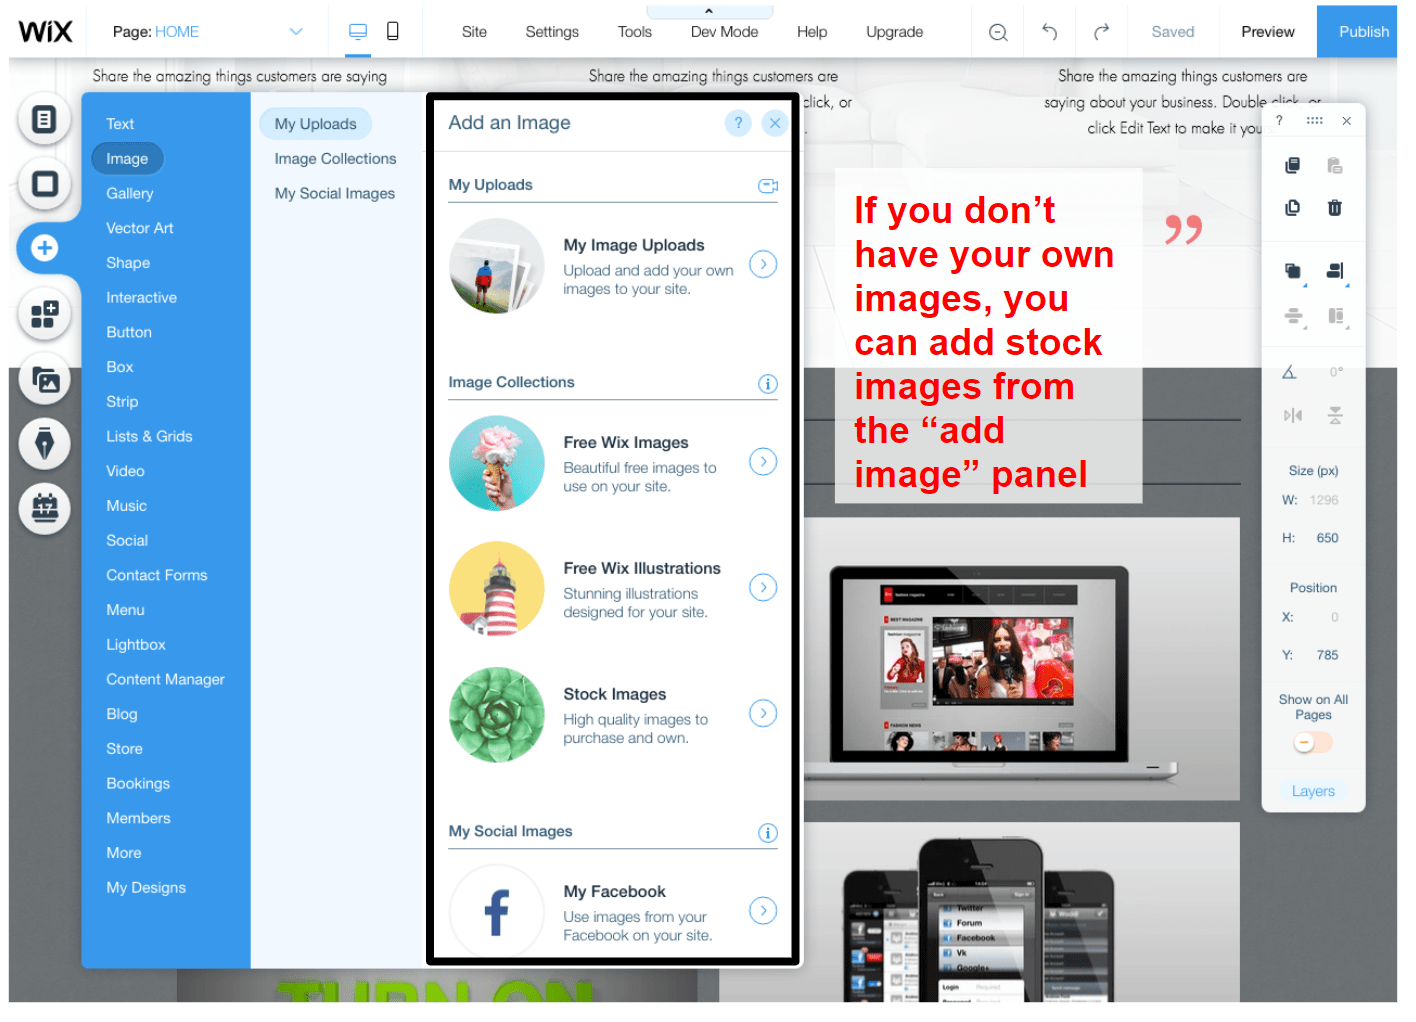
How to add an image
Like adding text to your website, adding images is incredibly easy. In Wix, open the Add menu, select Image (directly below Text), and choose from the range of image sources. You can upload your own images, use free Wix images and illustrations, search the database of Unsplash images, or choose premium stock images from Shutterstock (for an added fee). Then you just place the image wherever you want it on your page.
You can also use the Add Image tool to add a logo to your website. I’ve got some advice about logos further on in this article.
If you’re using free Wix or Unsplash images, these may be already optimized – meaning, they’ve been compressed for smaller file size, so they won’t slow your website down. If you’re using your own images, however, it’s a good idea to reduce the file sizes before you upload them. That’s easy to do with a free tool such as Image Compressor.
How to add a page to your website
Website builder templates usually include several pre-designed pages, such as Home, About Us, and Contact. If you want to add more pages – a Services page, for example – you can do this by clicking the Site Menu button at the top of the toolbar on the left and selecting the Add Page button at the bottom of the pop-out menu.
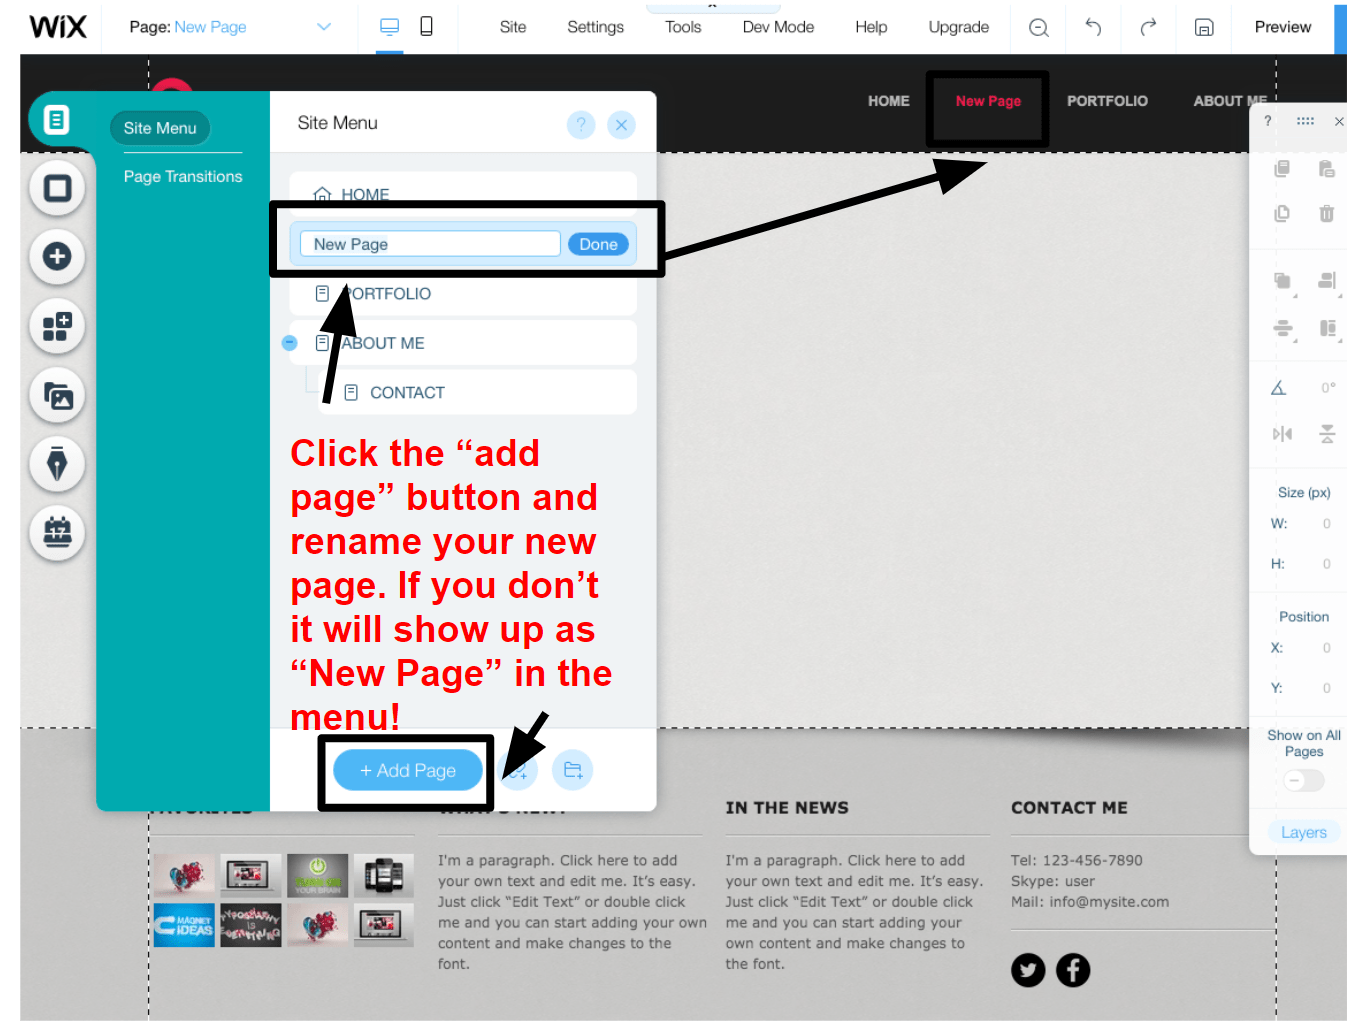
When you add new pages to your site, they will automatically show up in your navigation menu.
7. Add apps
Not all website builders have apps, but Wix has hundreds to choose from. Many of them are free, and even the paid apps usually have a free tier. You can use apps to easily add extra features to your website in a matter of minutes. For instance, you can add features like online booking, live chat, newsletter signup, social media integration, and much more.
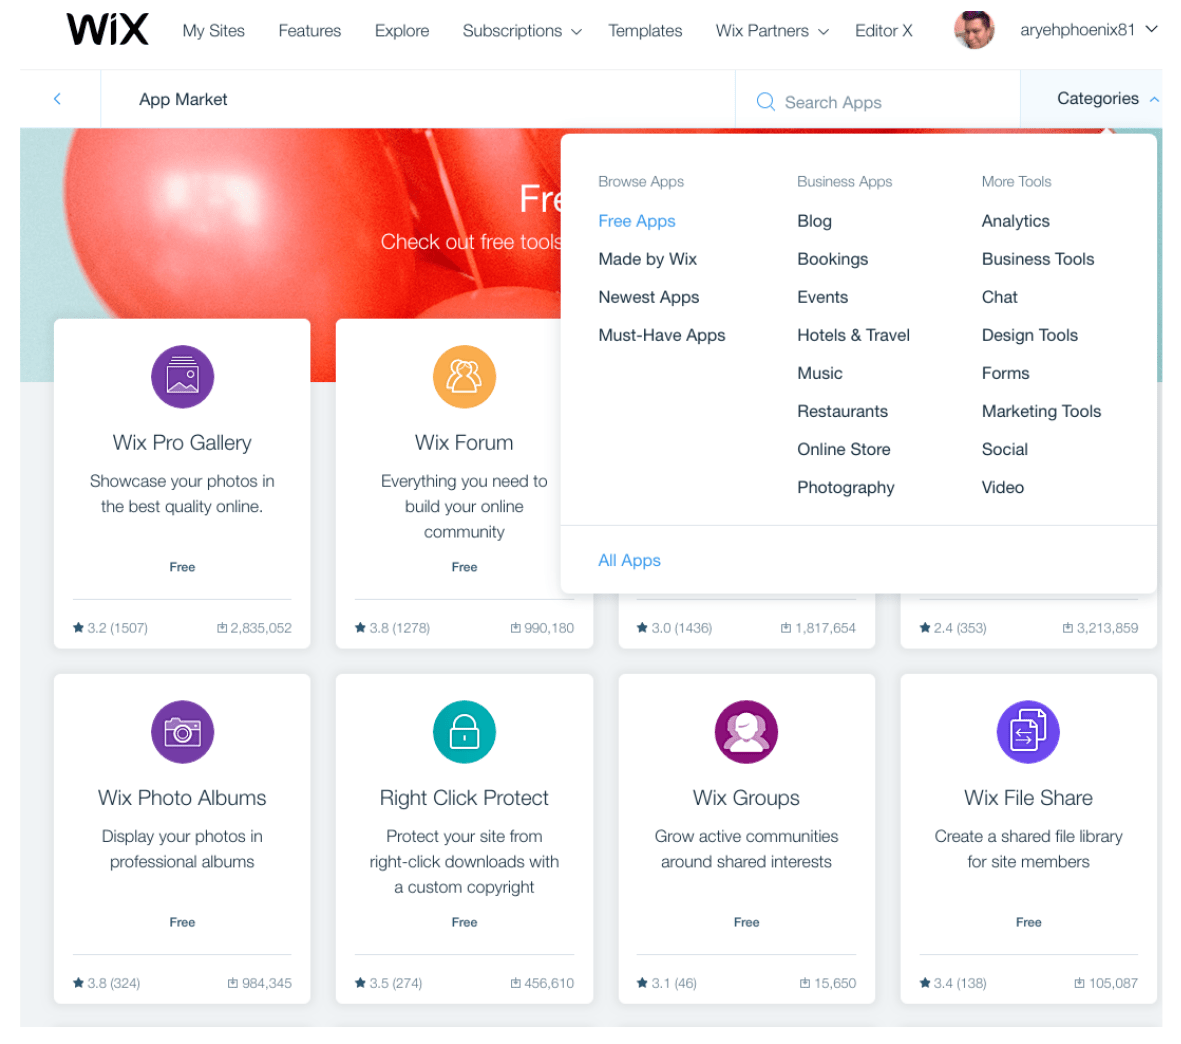
Adding an app to your Wix site is super-simple. Just click the App Market icon (directly below Add) in the toolbar and the Wix App Market will open in a pop-out window. You can search for a specific app, browse the categories to find new ideas, or have Wix suggest apps for your website type.
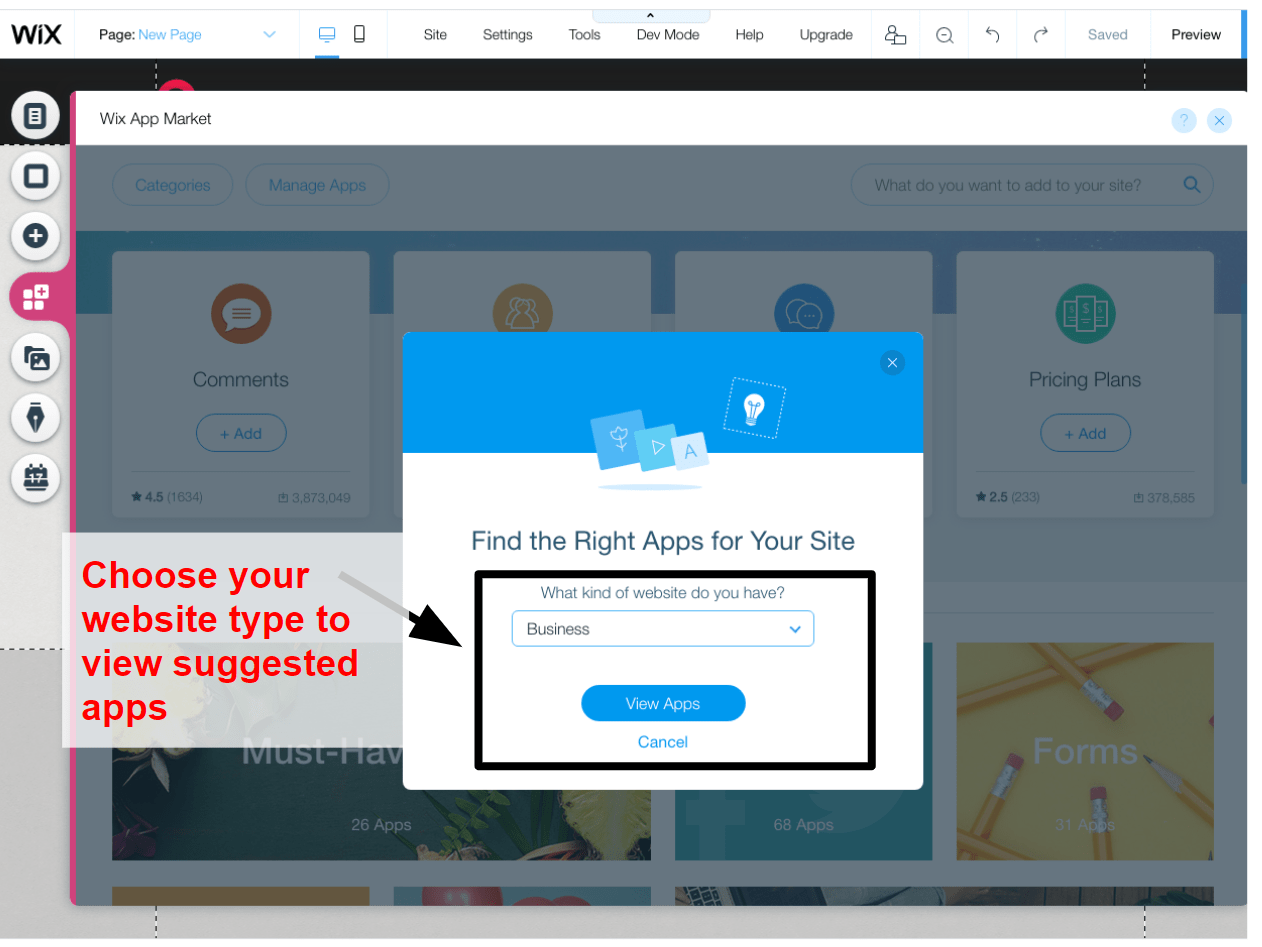
When you’ve found the app you want, just click on the + Add button and confirm on the next screen that you want to use the app on your website.

Once the app is installed, it’s immediately available on your web page. In this example, I added the Contact Collection app for mailing list subscriptions and had a signup form for my newsletter on my webpage within 30 seconds!
8. Choose a domain name
Before you publish your website, you’ll need to choose a domain name. If you’re on a free plan, you won’t actually have much choice, as you have to use a sub-domain (e.g. yourusername.wixsites.com/yourwebsitename). If you sign up for an annual paid plan, most builders will include a free custom domain name for the first year.
You can register a domain name directly through your website builder and it will be automatically set up for you, meaning all you have to do is choose the best domain name for your website. There’s a lot to think about when choosing a domain name, so don’t rush this step! One of the biggest issues is whether the domain name you want is actually available.
We have a handy guide to choosing your domain name with lots of tips and tricks – don’t miss it!
9. Preview and publish your website
Once you’ve added all your content and chosen your domain name, it’s time to get your website online. With most website builders, this is really just a matter of clicking a button (or two).
Before you hit the Publish button, it’s a good idea to use the Preview option to make sure you’re happy with the way things look. Of course, you can go back and make changes to your site at any time, but previewing allows you to see your site the same way your visitors will, without the distractions of the editor.
Most builders will also let you preview the mobile version of your site, to make sure it looks good on any device.
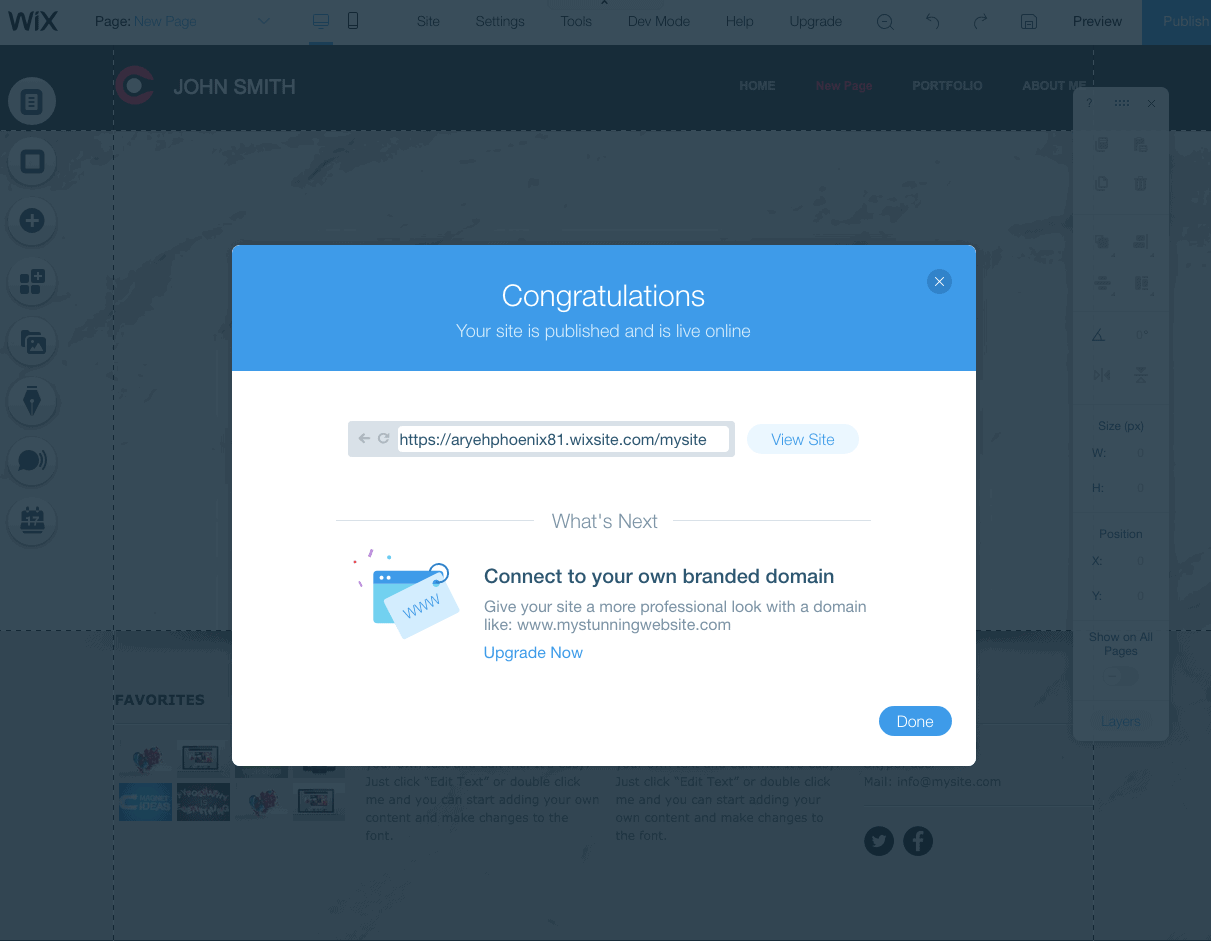
Once you hit Publish, your website is live, and you can start promoting it!
Website Builder Comparison Table
| Website Builder | Free Plan | Drag & Drop | Apps/ Integrations | Templates | Starting Price | |
| Wix | ✔ | ✔ | ✔ | 500+ | $0 | Read Review |
| SITE123 | ✔ | ✘ | ✔ | 180+ | $0 | Read Review |
| Squarespace | ✘ | ✔ | ✔ | 60+ | $12.00 | Read Review |
| Jimdo | ✔ | ✔ | ✘ | 100+ | $0 | Read Review |
| Weebly | ✔ | ✔ | ✔ | 50+ | $0 | Read Review |
| SimpleSite | ✔ | ✘ | ✘ | 30+ | $0 | Read Review |
| Volusion | ✘ | ✔ | ✔ | 40+ | $26.00 | Read Review |
| Shopify | ✘ | ✘ | ✔ | 70+ | $29.00 | Read Review |
| BigCommerce | ✘ | ✘ | ✔ | 140+ | $29.95 | Read Review |
Website Builder FAQ
Yes, your website will show up in search engine results. All website builders offer features that help your website rank higher in search results.In some cases, you’re limited to adding your own meta titles and descriptions, which help search engines and potential visitors to know what your web pages are about.
Other website builders give you more advanced SEO (search engine optimization) tools. For example, with Wix, you get SEO Wiz, a toolkit that gives you personalized SEO recommendations and step-by-step instructions on how to get your website noticed.
It really depends on how many products you plan on selling. For example, if you’re primarily going to be blogging or creating content but you also want to be able to sell a few products, then a regular website builder with e-commerce features is the better option.That’s because e-commerce builders are generally so focused on selling, that their blogging tools aren’t all that great. Wix gives you the best of both worlds, with great tools for creating content and a strong set of e-commerce tools.
However, if you’re planning on selling a lot of products through your own online store, then I’d definitely recommend a dedicated e-commerce builder like Shopify. E-commerce builders have more powerful sales management tools and some even let you sell via Instagram and Facebook as well.
Option 2: Using WordPress
Website builders are absolutely the easiest way to get your website online, but they can be a little more expensive than using WordPress with a web hosting plan. If you’re looking for a budget-friendly option and you don’t mind a slightly more technical site-building process, then WordPress is a great option that will give you a lot of flexibility.
Now, there are two versions of WordPress: WordPress.com, which is a simplified version, and self-hosted WordPress. In this section, I’ll be discussing self-hosted WordPress.
WordPress isn’t quite as simple to use as a website builder, but it’s still pretty easy to get started with – and its massive range of free templates and plugins give you almost limitless options for customizing your website. You don’t need to know how to code or have a lot of experience to build a great-looking website with WordPress.
Step-by-Step Guide
1. Choose a hosting plan
Although WordPress itself is 100% free, to make your website available online, you’ll have to sign up for web hosting (unlike with website builders, that provide hosting with their plans). For expert advice, you can check out our shortlist of the best web hosts.
There are lots of web hosting options available – but there are some that come with our experts’ stamp of approval.
Our Top Web Host Recommendations for WordPress Websites
- InterServer – With low monthly hosting prices and a price-lock guarantee, InterServer is an excellent solution if you’re a growing business. As its servers are located in the US, it can provide great loading speeds for a US-based target audience.
- Hostinger – As one of the cheapest hosting providers around, Hostinger is ideal if you’re on a budget. It provides excellent loading speeds (and we’ve tested it really thoroughly) and has a simple 1-click WordPress installer on its basic shared hosting plans. If you opt for managed WordPress hosting, you’ll benefit from enhanced security and servers that are optimized for WordPress.
- A2 Hosting – Offering standard shared hosting or managed WordPress hosting, A2 Hosting is a ‘green’ hosting company that works to reduce its carbon footprint. It delivers great speeds, and it’s also great for security, with its own HackScan threat detection and removal tool that’s included free.
- SiteGround – SiteGround is an affordable hosting solution for your WordPress website, with some specialized WordPress features, such as plugins that can boost your page loading speeds. SiteGround also excels at security.
- WP Engine – Since it only offers WordPress hosting, WP Engine is run by WordPress experts. It offers great performance, automated SSLs, and cool features like staging environments – so you can work on changes to your website without affecting your live site.
When you’re choosing a host for your WordPress website, there are some features you should look for:
- SSL certificate. An SSL certificate makes your website secure, ensuring your site has the little padlock icon in the address bar of web browsers. Most web hosts will include one for free. Once your website is live, you can check that the SSL certificate on your website is working properly with the SSL Checker Tool.
- WordPress optimization. The best web hosts for WordPress have specially optimized servers to improve performance, so your web pages load faster.
- Security features. Some web hosts charge you extra for essential security, so you should try to find one that includes important features such as malware protection, firewalls, and automatic backups.
2. Choose a domain name
The process of choosing your domain name is pretty much the same as for website builders. Some web hosts include free domain names with annual plans, but not all do. If you choose a host that doesn’t offer a free domain name, it may be cheaper to buy your domain name from a third party rather than via your web host, as you can pick up a domain name for as little as $1 on some domain marketplaces.
3. Use a one-click installer to install WordPress
Some hosting plans come with WordPress pre-installed. If your plan doesn’t, don’t panic – you can use the one-click installer provided by your host.
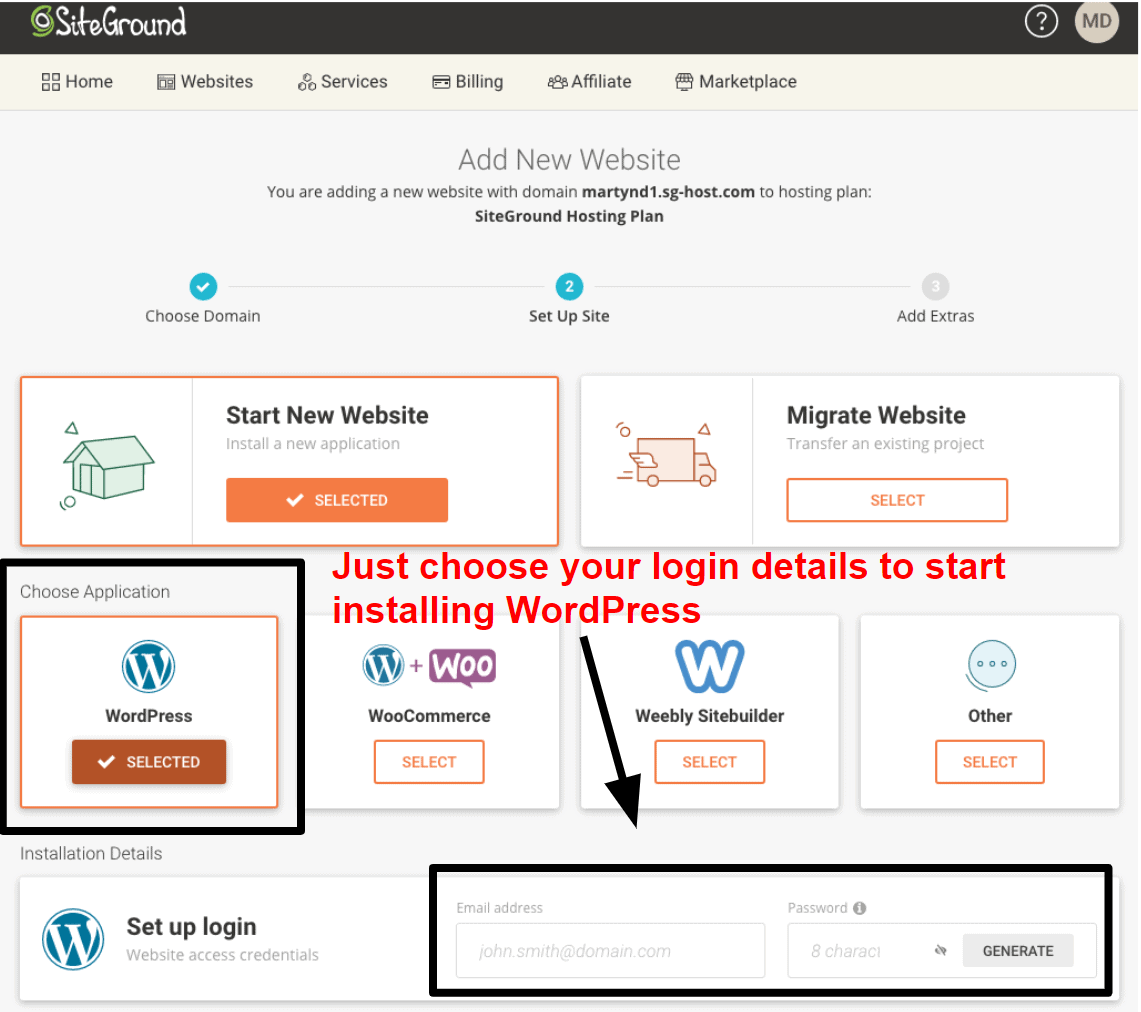
Technically, these tools aren’t exactly one-click, but within a few clicks, they set up all the scripts and databases needed to make WordPress work on your website. All you really have to do is provide a username and password that you want to use to log in to WordPress once the installation is complete.
Different hosts may use different one-click installers, but essentially they’re all the same, and they’re all incredibly easy to use.
4. Access WordPress through your hosting dashboard
The exact way you’ll access WordPress may vary depending on your web host, but in most cases, you’ll find a section in your hosting dashboard for managing your WordPress website.
I’m demonstrating this using SiteGround. In the screenshot below, you can see that there’s a button to automatically log in to my WordPress website’s dashboard. For other hosts, you may have to type in your WordPress username and password to log in.
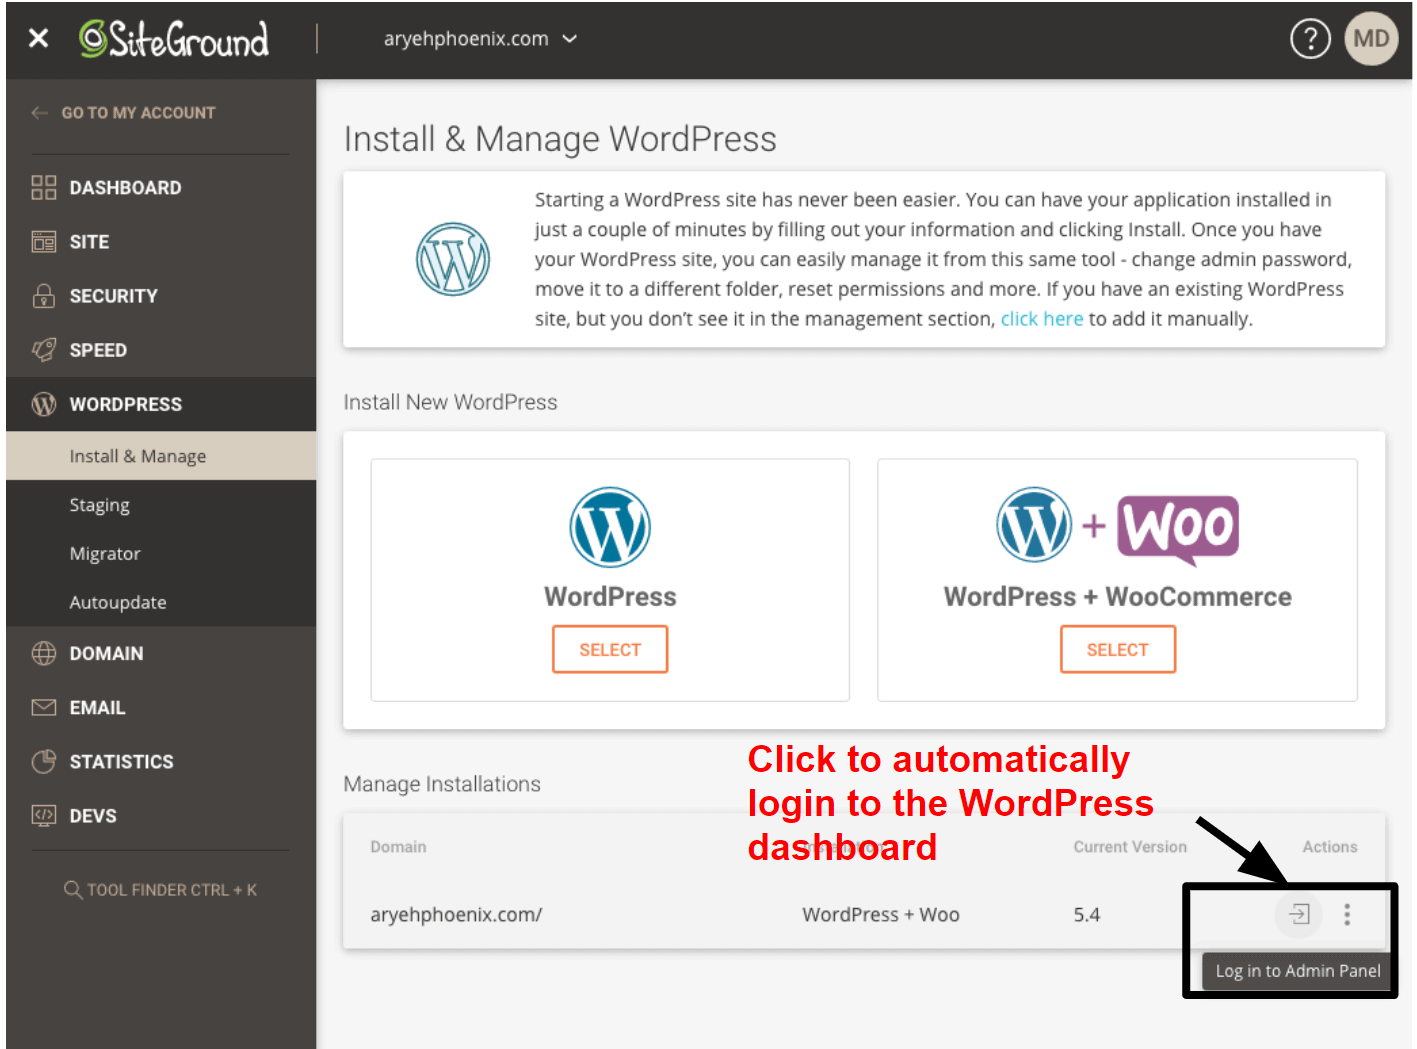
The first time you launch WordPress, the dashboard may seem a little overwhelming, but it’s actually really easy to navigate. Below is a screenshot of the dashboard with all the important elements labeled for you.
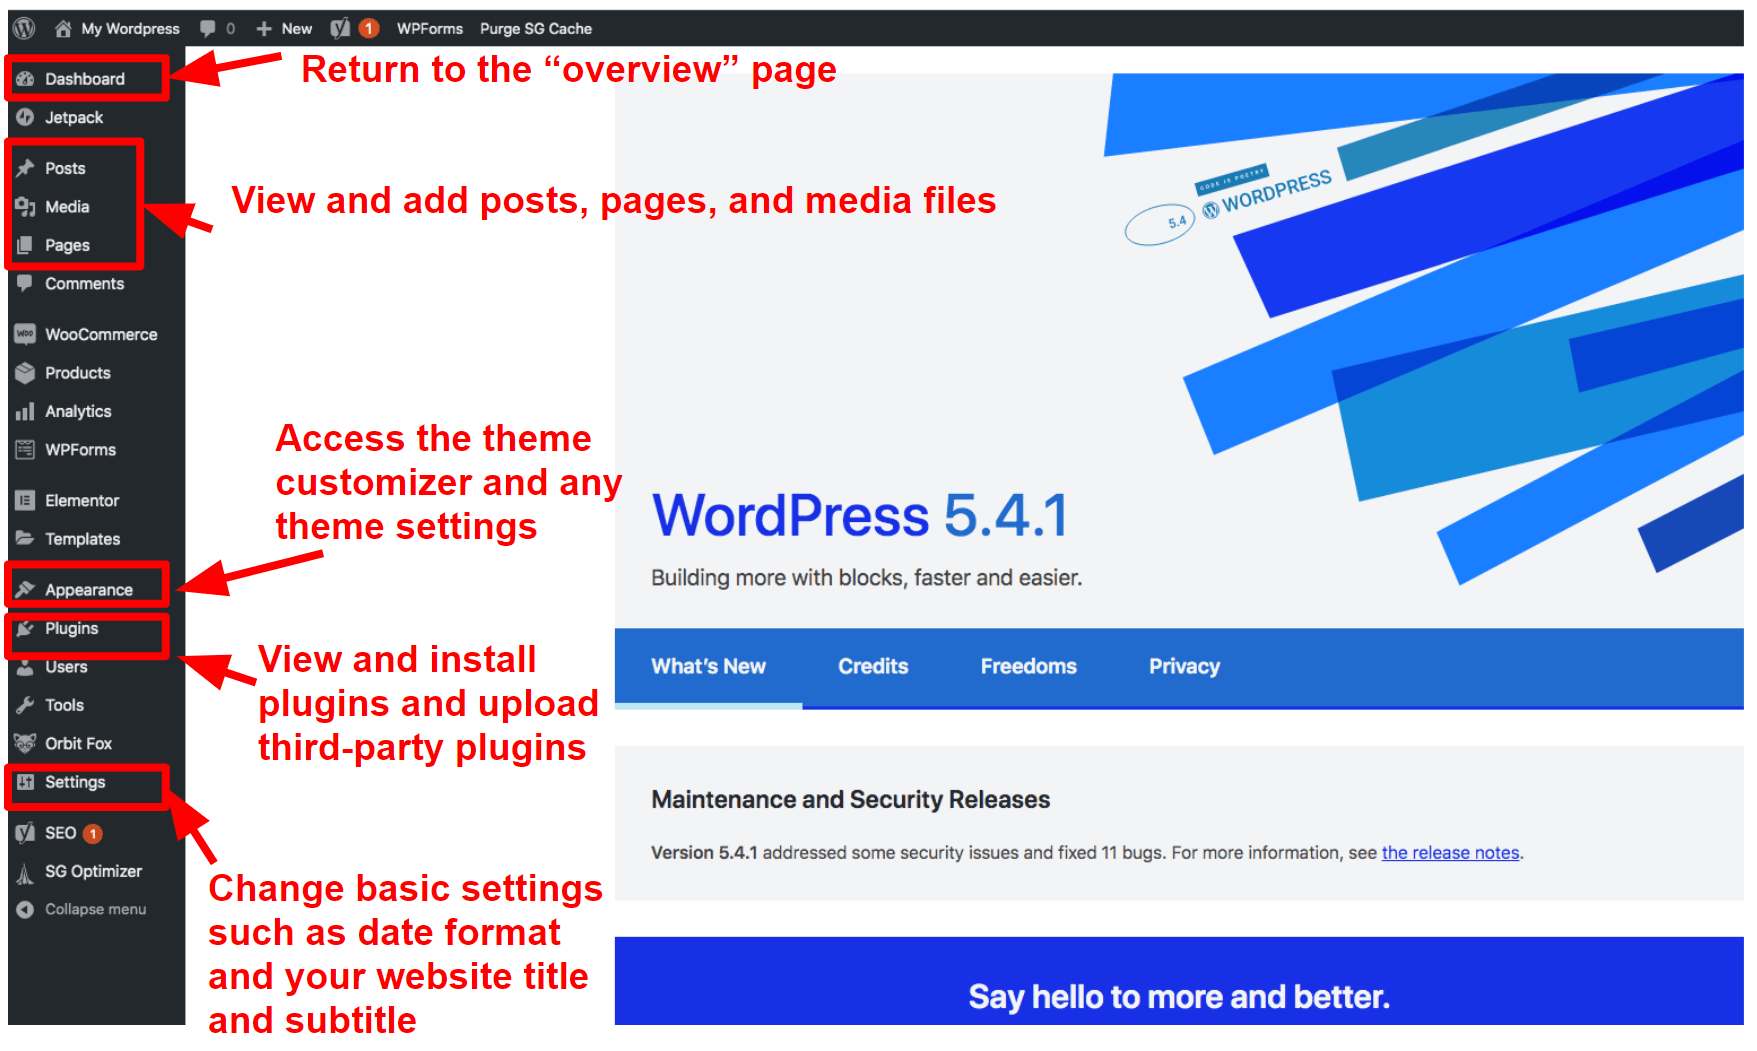
WordPress uses some jargon that’s different from website builders, so to make things easy, here’s a brief rundown of the different sections of the WordPress dashboard:
| WordPress Element | What It Does | Website Builder Equivalent |
| Posts | View, edit, and add new posts to your website (see below for more about posts and pages) | Blog |
| Media | View, edit, and upload new images and other media types (e.g. videos) | Gallery |
| Pages | View, edit, and add new pages to your website | Pages |
| Theme Installer | View existing themes, search for free themes from the WordPress repository, and add third-party themes | Templates |
| Customizer | Customize your website colors, fonts, layouts, and more (depending on the theme), with a live preview of how your changes will look | Design |
| Theme Settings | Not all themes include this section, but premium themes tend to have a larger range of settings that aren’t available in the customizer view | N/A |
| Plugins | View and activate/deactivate existing plugins, search for and install plugins from the WordPress Repository, and upload third-party themes. | Apps |
| Settings | Change basic settings such as your site title/subtitle, date format, and permalinks (the URL structure of pages and posts). | Settings |
5. Choose a theme
Themes in WordPress are very similar to templates in website builders. The biggest difference between templates and themes is that in WordPress, themes control more than just the general style/layout of your website. Themes can include plugins (or “required plugins” to add extra features like portfolio post/page types.

The default theme that comes with WordPress is pretty basic, so you’re probably going to want to install a different theme. This is really easy to do, thanks to the WordPress theme installer. This allows you to search the WordPress theme repository and instantly install any of the thousands of free themes available. You can install multiple themes and use the customizer to see how they will look on your website before you activate them.

In addition to the free themes available in the WordPress repository, you can purchase premium third-party themes from marketplaces like TemplateMonster and ThemeForest.
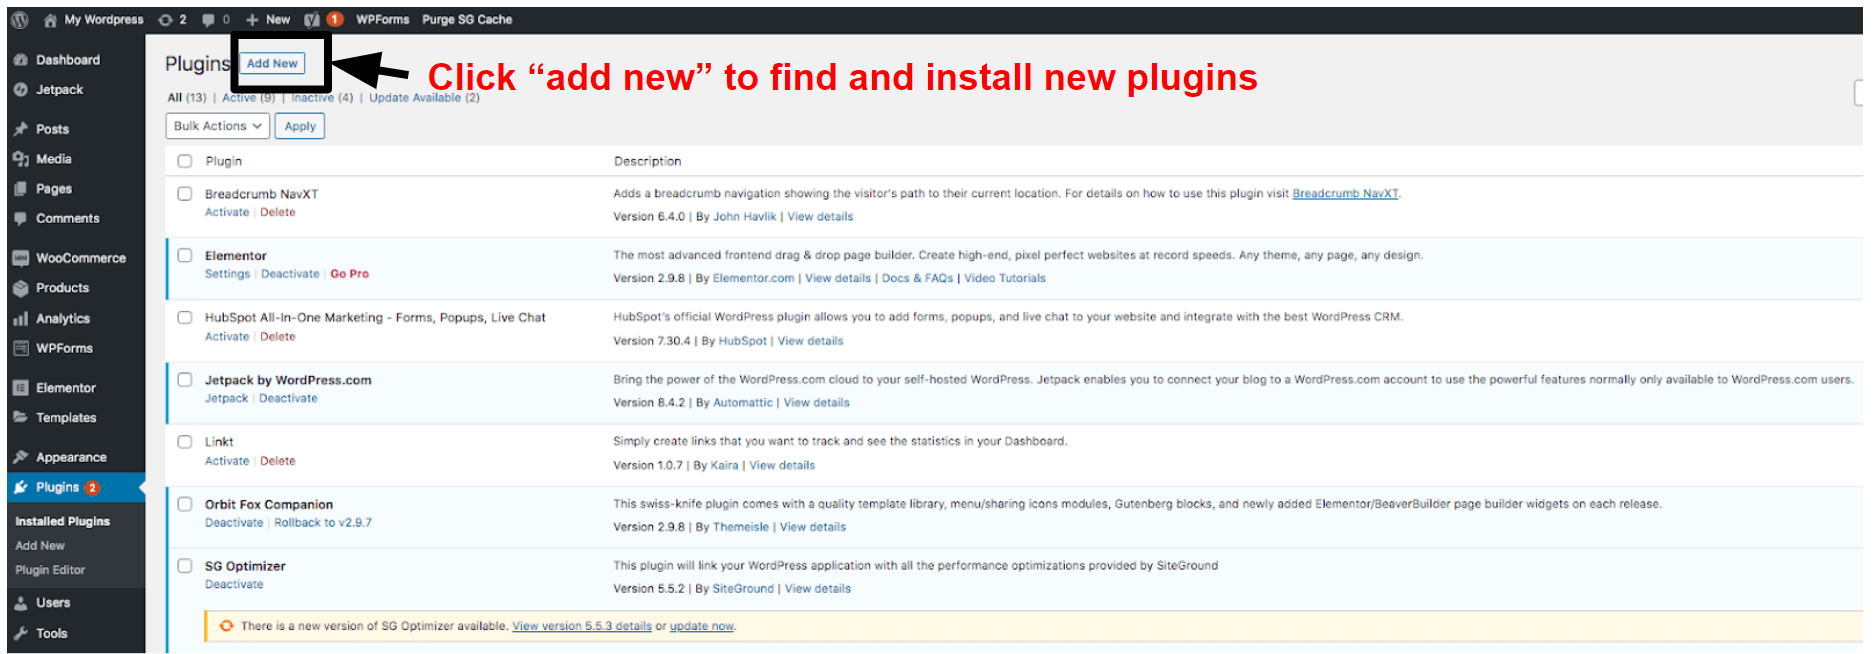
6. Add plugins
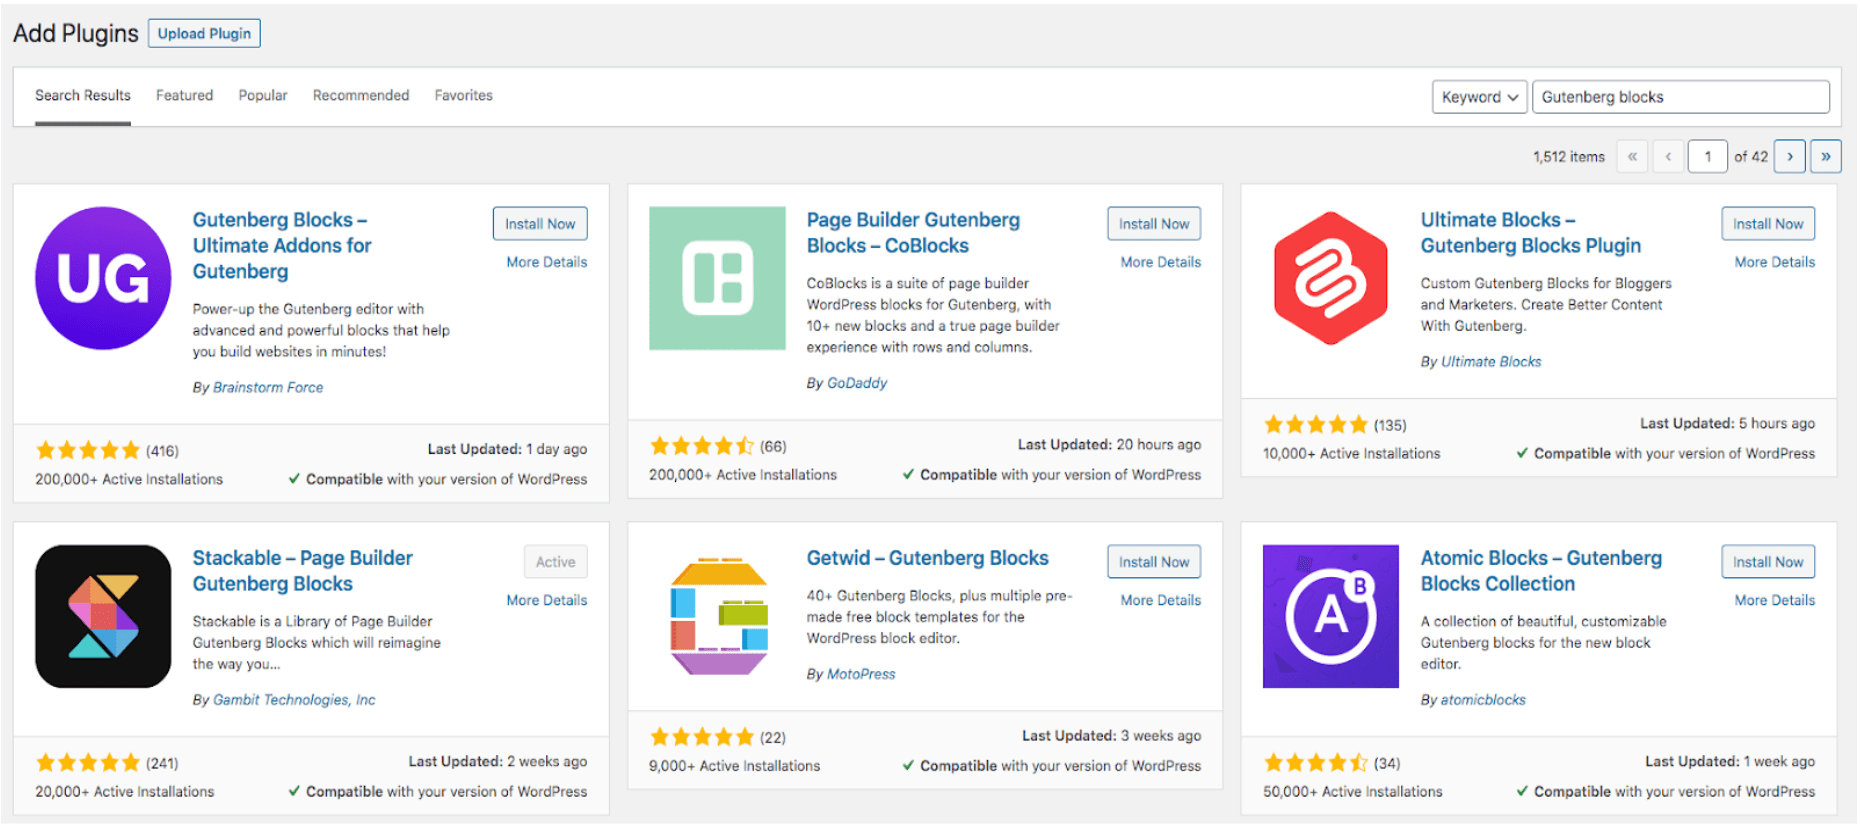
Plugins are similar to the apps offered by website builders – they add extra features to your website that aren’t included in WordPress itself. For example, you can install a plugin to create a contact form (e.g. NinjaForms) or build an online store using WooCommerce. There are plugins for pretty much everything you can think of, from SEO (search engine optimization) to creating an online portfolio.
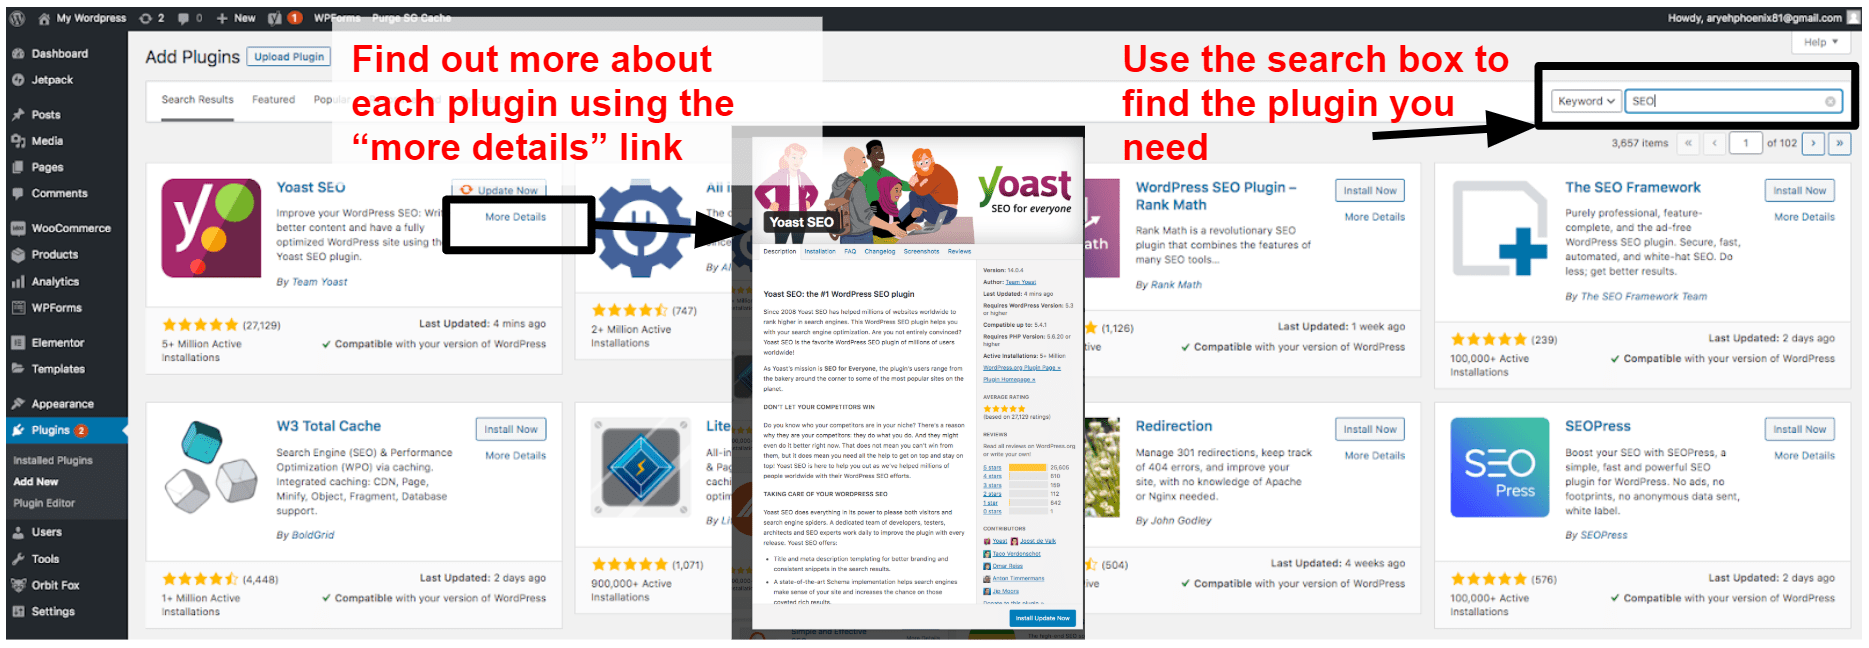
There’s a search box to help you find the plugins you need, and you can find out more about each plugin, including whether it’s compatible with your version of WordPress, what features it has, and what other users think about it.
Installing plugins takes a single click, but your plugins will only work on your website when you have clicked the “activate” button in the plugins panel.
7. Create your first post
One of the most frequent questions I get asked about WordPress is regarding the difference between pages and posts. Essentially, pages are the static content – i.e. the content on your website that doesn’t change or doesn’t change very often, such as an About Us page. Posts are more dynamic – they show up on the ‘blog’ page or category pages of your website. The key difference between pages and posts is in the way WordPress displays them on your site.
The editor for creating posts and pages is exactly the same, so the process for creating pages and posts is identical. In the screenshot below, you can see that when you click on the “posts” panel of the dashboard, you’ll see a list of your existing posts (some themes come with “demo” content), with an Add New button at the top.
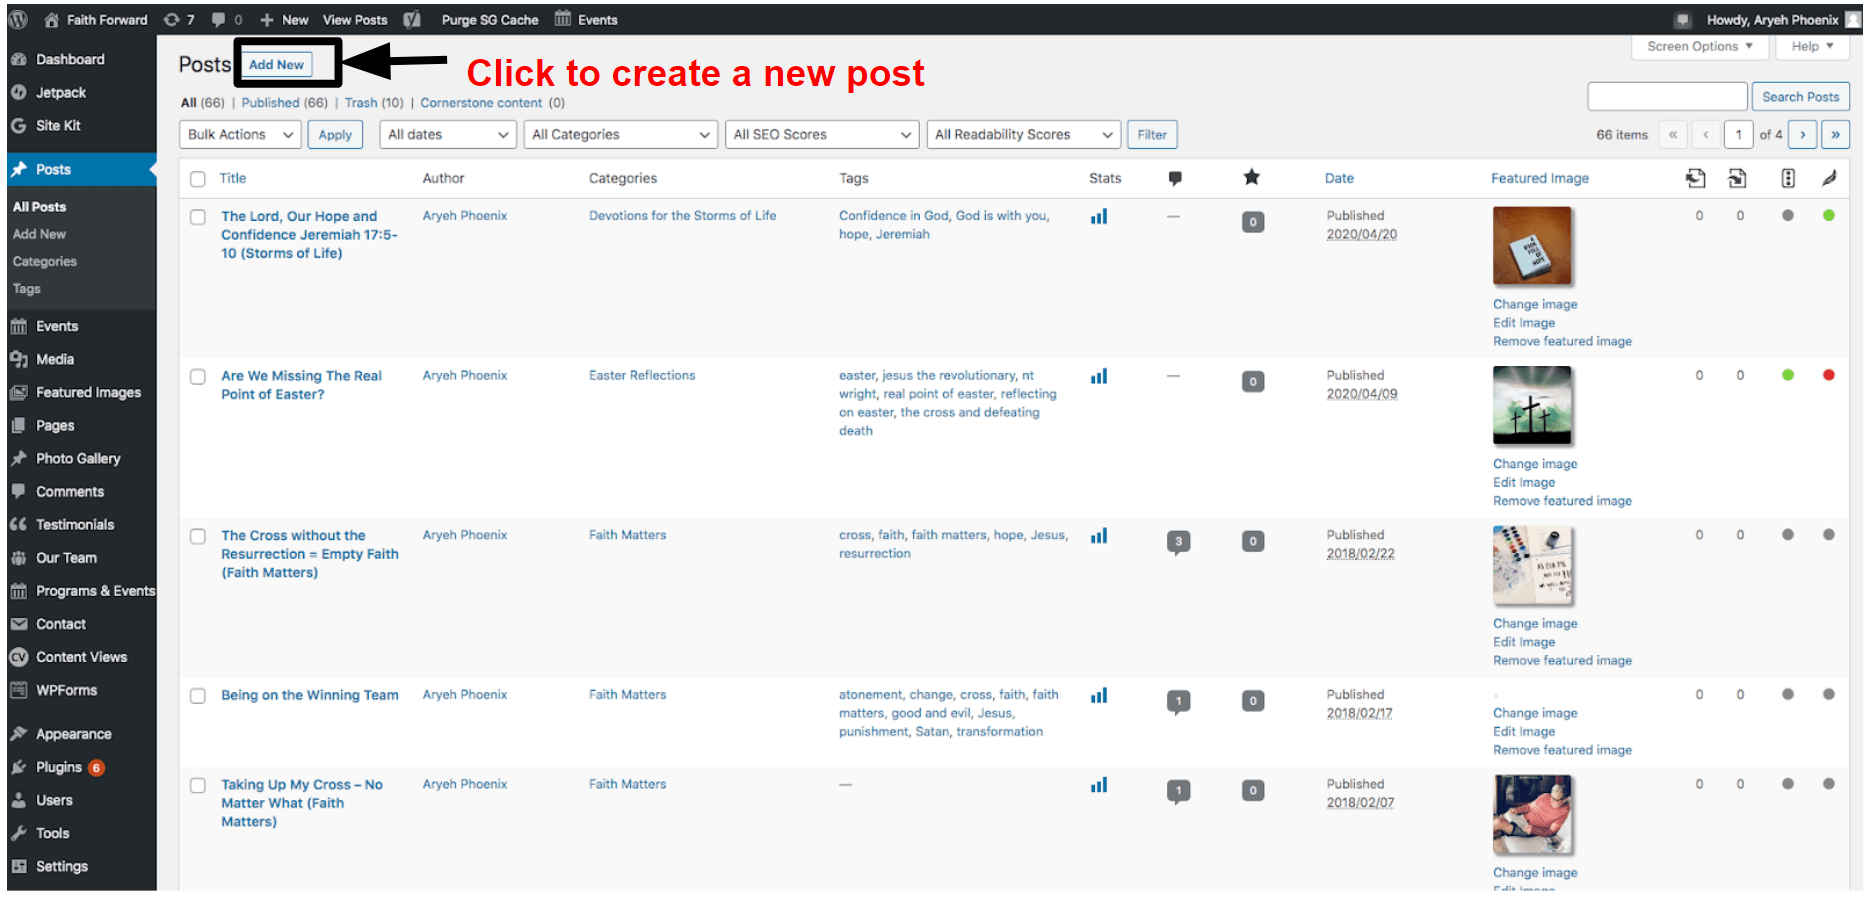
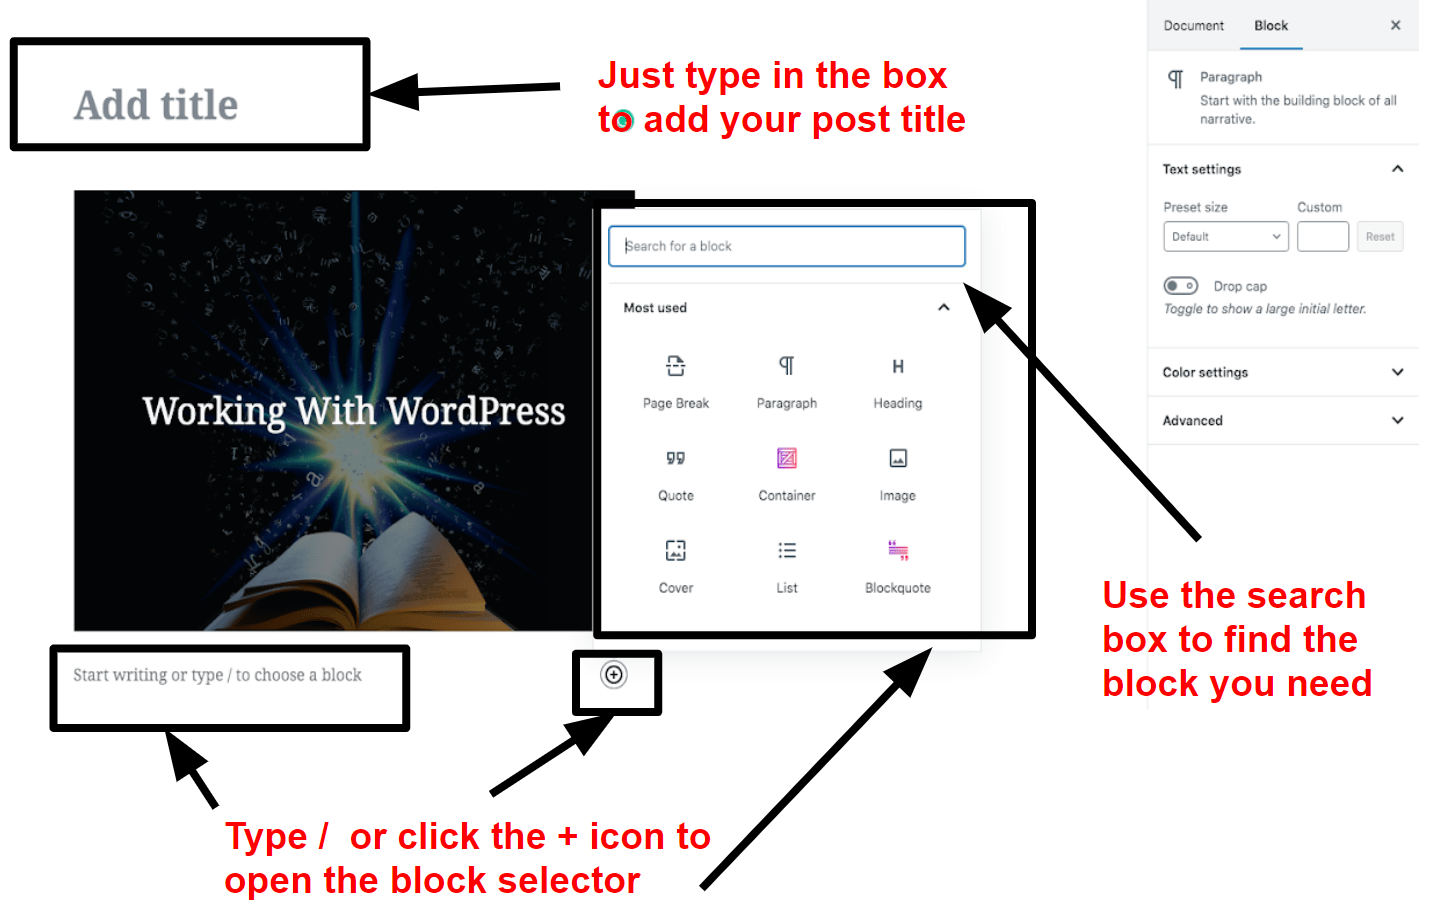
Clicking the Add New button will take you to the editor. WordPress’s default editor used to be pretty basic, but the Gutenberg version that was introduced with WordPress 5.0 gives you much more features. It uses “blocks” to create your posts and pages, along with layouts (columns), sections, and containers. You can add more blocks to the Gutenberg editor using free plugins.
Block types included in the standard Gutenberg editor include:
- Paragraph
- Heading
- Quote
- Image
- List
- Cover image
- Gallery
- Slideshow
- Table
- Buttons
To choose a block, you can click the “+” icon at the side of each paragraph area or type “/” into the free space labeled “start writing or type / to choose block”.
8. Publish your site
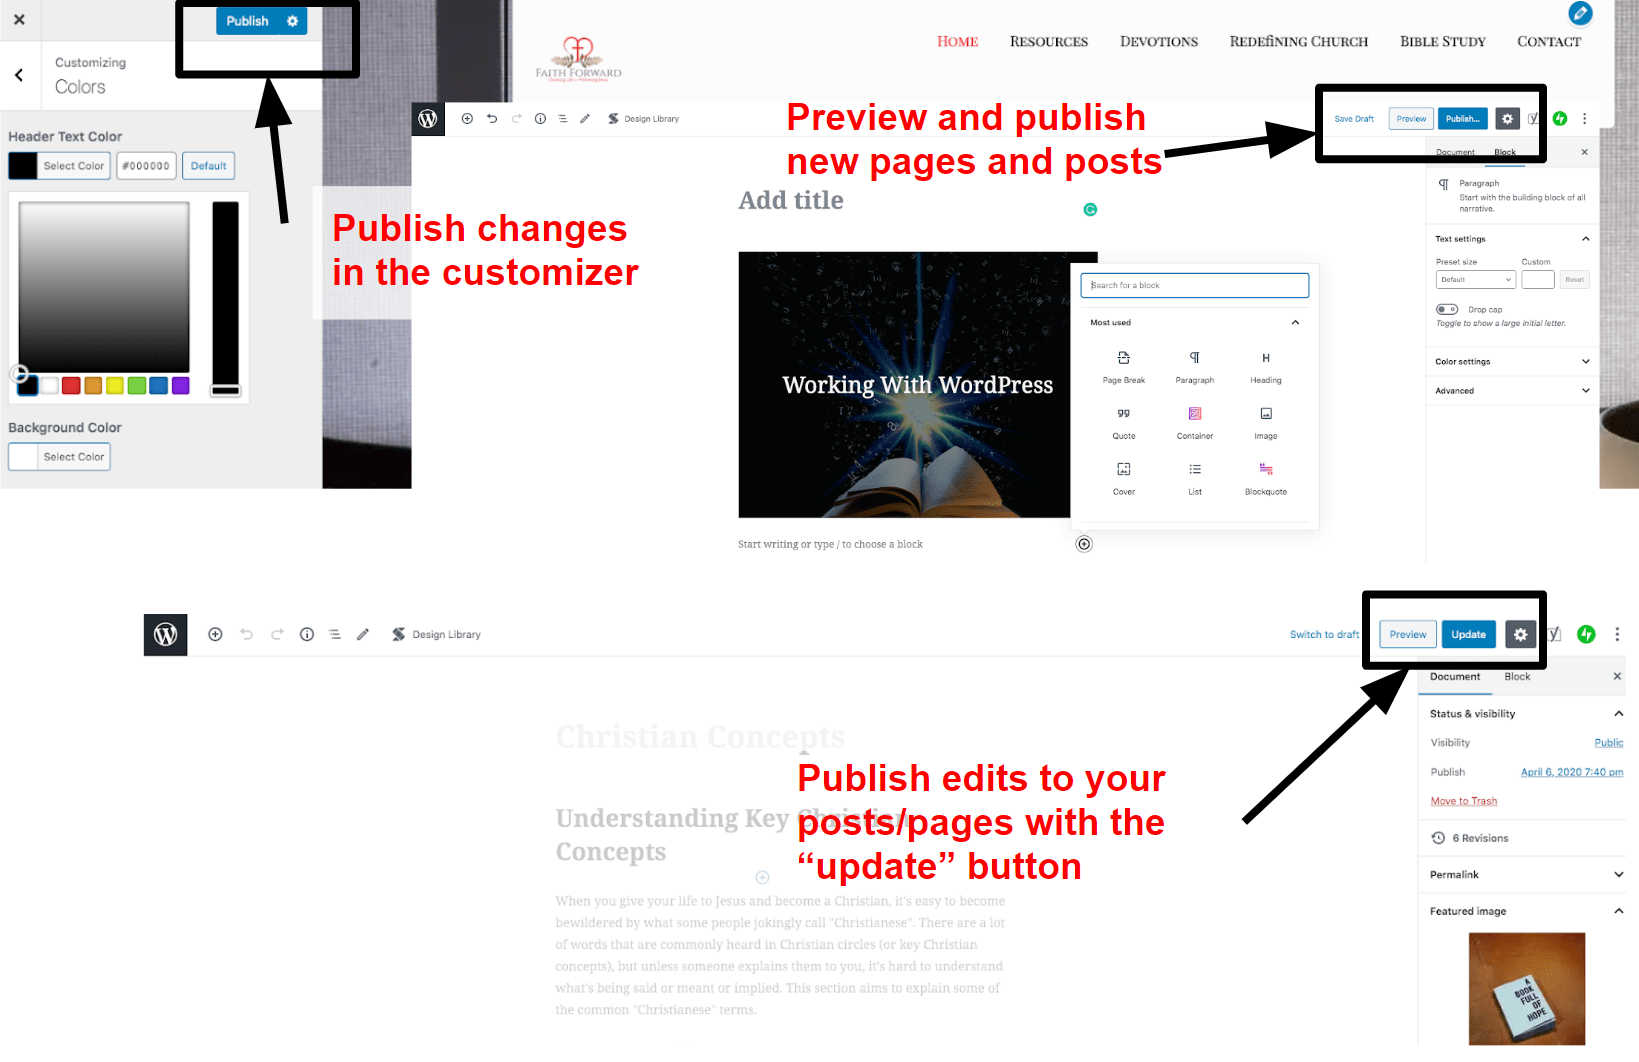
Unlike some website builders (such as Wix), WordPress doesn’t have a specific Publish button for your whole website. As soon as you create your WordPress website, it’s live on the internet. However, there are three separate places where you’ll find Publish buttons in WordPress.
These are:
- In the customizer, where you’ll see a button at the top of the panel which saves changes and makes your customizations live.
- At the top right of each new post you create. Until you press publish, your post is only a draft and won’t be visible. If you go back later to make edits, you need to click update to make your changes live.
- At the top right of each new page you create. As with posts, your content is just a draft until you publish, and when you make edits you need to click update or your changes won’t be saved.
Consider Spending $5 on a Web Developer and Save Time and Frustration
If you’re short on time or just don’t want to deal with any problems that could occur when building a WordPress website, then hiring a professional to build (and, perhaps, maintain) your website could be a better choice.
Hiring a developer sure sounds expensive, but thanks to the rise of Fiverr, you don’t have to spend a small fortune. I just did a quick search on Fiverr for full WordPress website creation and found plenty of professional website designers offering to build your website for as little as $5!
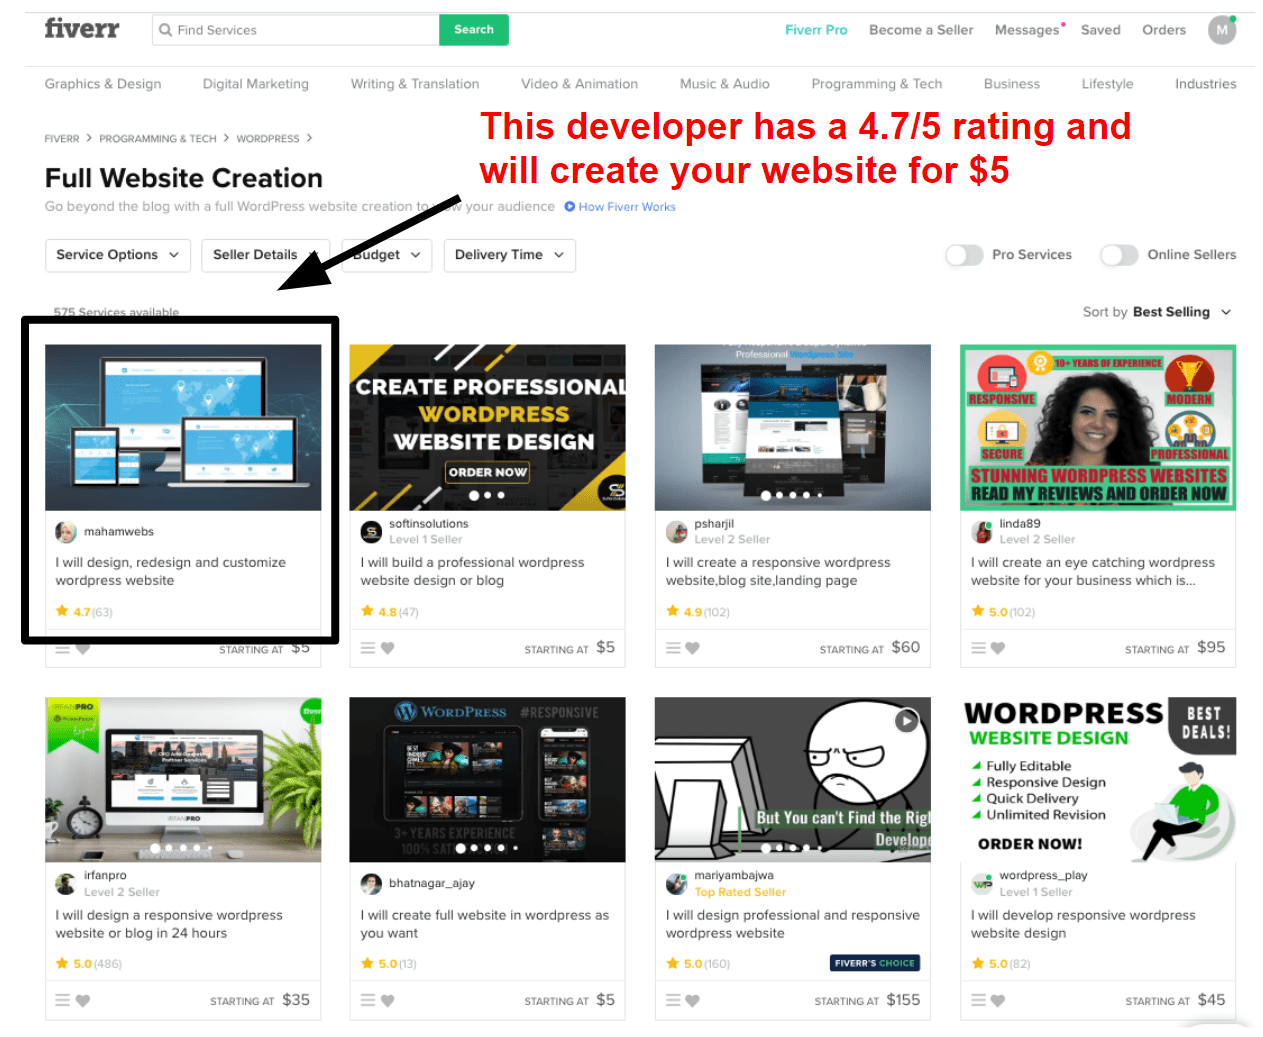
One of the best things about Fiverr is that you can browse examples of a designer’s work to get an idea of whether they’re right for the kind of website you want. Plus, with Fiverr you’re fully protected as Fiverr doesn’t release your payment to the freelancer until you’re satisfied with their work.
WordPress FAQ
Yes, you can build a WordPress website without hiring a developer – but if you’re new to website building, you’ll probably find Wix much easier (and faster) to use. WordPress is more complex and it’s easier to mess up your website when making changes to settings or by installing plugins that conflict with one another.Hiring a developer for your WordPress website isn’t as expensive as it sounds! You can actually find a developer to meet any budget on Fiverr.
The main difference between WordPress.com and WordPress.org is in the way they’re hosted. With WordPress.com, you don’t have to pay separately for hosting but you will need to upgrade to one of the highest-priced plans (Business or eCommerce) to use plugins and upload themes from third-party marketplaces.WordPress.org is self-hosted, so you pay for hosting separately. You have complete control and freedom with this version and it can work out much cheaper than WordPress.com.
There are pros and cons to both Wix and WordPress. Wix is more beginner-friendly but it can cost more than buying a hosting plan and building your site with WordPress.WordPress gives you a lot of flexibility and is almost limitless in what you can add to your website via plugins, but it can be trickier to learn and there’s potentially more that can go wrong. For example, incompatible plugins can cause your website to stop working. Also, WordPress has more security vulnerabilities.
You don’t need a special WordPress hosting plan, as WordPress will work on any shared hosting plan that has a one-click installer. However, there are definite benefits to choosing a WordPress-specific hosting plan.WordPress-specific hosting plans can be managed or unmanaged. With unmanaged plans, your hosting is pretty much the same as basic hosting, but your website will be hosted on servers that are optimized for WordPress and you might get access to some optimization plugins.
Managed WordPress hosting is the hassle-free version, as your host takes care of things like updates, security patching (depending on the host), and backups, so you can just get on with building your website. Click here for a list of the best managed WordPress hosting providers.
Taking Your Website to the Next Level
Now you’ve built your website, it’s time to get it noticed. In my experience, you’re never completely finished with building a website, since you can always keep updating it, changing things and making it better. You want people to start visiting your website and there are a number of things that you can do to grow your audience and give your site visitors a better experience.
Designing a Logo
You don’t need to have a logo before you start building your website, but a logo does make your website look more professional and can help build your brand.
Your logo says a lot about you, so it’s important to take time to get it right. There are design trends to take into consideration – for instance, have you thought about the impact your color scheme can have on your target audience? Read more about the latest logo statistics from the Fortune 500 list to explore this further.
There are two ways to get yourself a logo – and both are affordable. My colleague actually tested all the major logo design services to find a new logo for Website Planet. To read all about his experiment and see who won, read our full comparison of the best online logo design services.
1. Do It Yourself with an Online Logo Maker
The DIY method may sound like the cheapest way to get a logo – but this isn’t always the case. Most online logo makers are free to try, but you will have to pay to download and use your logo. There are a few free logo makers out there, but they’re very basic and I don’t recommend using them.
My favorite of all DIY logo makers is Wix Logo Maker. This tool uses AI (artificial intelligence) to generate lots of logo ideas based on your own personal preferences. When you spot a design you like, you can customize everything from the fonts to the color scheme. You can even download a free low-res version of your logo so you can see how it might look on your website and social media before you make your final purchase.
2. Hire a Designer
Hiring a logo designer might sound expensive – but on Fiverr, you can get a professionally designed logo for as little as $5. Most Fiverr designers display examples of logos they’ve created, making it easier to find someone who offers the style you’re looking for. We tested Fiverr’s logo designers ourselves and were really impressed with the quality of the finished logos.
In addition to your logo, you’ll also need to generate a favicon – this is the small image that you usually see in browser tabs next to the website name and in your bookmarks. You can create a favicon in seconds with our nifty favicon generator tool.
Optimizing Your Site
Even if you build a fabulous website, it’s not going to show up on the first page of search engine results pages (SERPs) without some optimization. Optimizing your website involves search engine optimization (SEO), analyzing your traffic, and understanding what your audience is looking for.
For SEO, there are some great tools that you can use to make optimization easier. One of the best tools available is SEMrush (check out our Guide to SEMrush to find out more), but there are other options if SEMrush is out of your budget. We’ve reviewed some of the best SEO Tools to help you choose the right one.
Creating the right content for your website might seem like a challenge, but by using analytics tools to find out more about your audience (where they live, their age, their gender, and so on), you can tailor your content better. Read our Guide to Google Analytics to see how to get the most out of analytics tools. You can also use tools like Answer the Public to find out what people are searching for. Check out our Guide to Answer the Public for more about this.
Grow Your Audience with Email Marketing
Email marketing is one of the best ways to grow your audience – and there are lots of tools to help you succeed with your marketing efforts.
Email marketing has the power to grow your business quickly. It has a high click-through rate (CTR), too – up to 100x better than social media channels like Twitter. You can use email marketing to offer discounts and promotions to customers, encourage them to share your business with others, and offer free resources to get visitors to sign up for your mailing list.
To get the most out of email marketing, you’ll need to think about the frequency of your emails, using automated emails, and what to put in your email newsletters. For more tips, check out our collection of the most important email marketing stats.
We have tested and reviewed the best email marketing platforms. No time to read a bunch of reviews? No worries, here’s a quick overview of our favorite email marketing solutions.
- Constant Contact – With hundreds of email templates to choose from and a 30-day free trial, Constant Contact is our top choice for email marketing. It’s great for creating automated emails, and it’s really easy to use, meaning you can get started right away.
- Benchmark Email – Supporting multiple languages, Benchmark Email is a top choice if your native language isn’t English. It has a free plan, too. It’s great for beginners but has more advanced tools that you can use as you grow more familiar with the platform.
- Sendinblue – Offering SMS marketing as well as email marketing tools, Sendinblue has an affordable solution that’s easy to use. It even has a generous free plan. You can create automated emails, add workflows, and use the option to “send it at the best time”.
- Active Campaign – As a more advanced platform, Active Campaign is better suited to professional marketers – but if you run a small to medium-size business, you can absolutely benefit from Active Campaign’s features.
- AWeber – Offering a unique drag-and-drop campaign builder, AWeber gives you everything you need for successful email marketing. It’s very beginner-friendly but still has more complex features, such as split-test functions and over 850 integrations.
- GetResponse – More than just an email marketing platform, GetResponse is a multi-functional platform that incorporates marketing, customer relationship management (CRM), and webinar features. There’s a 30-day free trial, too.
Final Words
Phew! That’s a lot of information we’ve covered. To sum up, here are a few key takeaways from this guide to building your own website:
- Website builders are a great place to start when you’re a beginner. Wix is one of the most flexible of them all, allowing you to start with the basics and add more advanced apps later.
- WordPress is often regarded as more difficult than website builders, but it offers much more freedom. It’s also a cheaper way of getting your website online, with lots of low-cost website hosting plans available.
- If you don’t have the time to build your website yourself, you can hire a developer on Fiverr for as little as $5. Who said working with a web developer had to break your budget?
- Publishing your website isn’t the end of the process. You can keep optimizing and promoting your website with tools for SEO, analytics, and marketing.
Anyone can build a website and it doesn’t matter if you’re a beginner or only have a tiny budget to spend. Have fun creating your website!
Original Post Continue Reading